
3D embroidery vs 2D embroidery is a decisive choice for designers, shaping product aesthetics, tactile quality, and brand perception across apparel, accessories, signage, and home decor, and it often dictates what users notice first, how they feel when touching the surface, how it photographs, and how durable the impression will be over time, including impact on merchandising and consumer trust. To guide this decision, many readers look for the differences between 3D and 2D embroidery, which highlight how depth, height, texture, light reflection, seam behavior, and background complexity influence legibility and visibility from a distance, as well as how fabrics respond under wear and washing, across subtle knit blends and durable workwear alike. Understanding 3D embroidery techniques helps you anticipate padding needs, stack heights, underlay strategies, and how variations in underlay and satin stitches interact to form a raised design, while also considering heat tolerance, thread sheen, fabric stretch, stabilizer compatibility, and how the look holds up after repeated laundering and field use. By contrast, 2D embroidery techniques focus on flat surfaces and precise fills, while dimensional motifs rely on stable stabilizers and careful alignment to preserve edge clarity, ensuring logo integrity on diverse fabrics from jersey to twill, denim, or lightweight knits, even after routine washing and frequent handling. For a bold yet controlled look, puff embroidery vs flat embroidery offers another axis of decision, balancing visibility with fabric behavior, wearability, and wash durability, and giving designers a practical choice that complements branding strategy, production timelines, cost considerations, and the intended consumer experience across multiple channels.
In more everyday terms, three-dimensional stitching can be described as raised or textured embellishment, while two-dimensional stitching stays flush and smooth, producing a different silhouette on caps, jackets, and bags. This framing aligns with Latent Semantic Indexing principles, using related terms such as raised elements, flat surface embroidery, texture, depth, and edge stability to cover the same concept from multiple angles. By considering synonyms and related concepts, designers can plan digitizing workflows that optimize for legibility, durability, and brand voice across channels.
1. Understanding the core differences between 3D and 2D embroidery
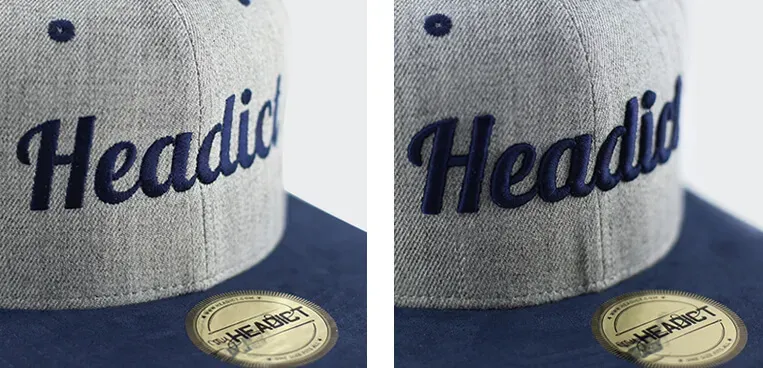
The differences between 3D and 2D embroidery go beyond just look; they affect depth, texture, and how the design interacts with the fabric. 3D embroidery adds height with padding and layered stitching to create a sculptural effect, while 2D embroidery stays flush with the surface, delivering a flat, clean silhouette. This contrast influences visibility, touch, and durability, especially on items like caps and jackets where texture catches the eye from a distance.
When deciding which approach to use, consider the project’s purpose and the fabric. Logos designed for banners or apparel that must stand out from the crowd benefit from 3D embroidery’s dimensional feel, whereas small text or fine logos often fare better with 2D embroidery’s crisp lines. Understanding these core differences helps designers choose the right technique for logos, fashion, home decor, and signage, balancing impact with wearability.
2. 3D embroidery techniques, padding materials, and the puff embroidery effect
3D embroidery techniques rely on padding materials such as foam or felt placed under the stitch area to create height. Layered fills, underlay stitches, and satin stitches work together to produce the raised surfaces that define 3D designs. Puff embroidery is a popular subset of 3D work where a small amount of padding creates a bold, puffed effect that reads strongly on apparel and caps.
Selecting the right padding thickness and stabilizer is crucial to maintain edge control and prevent distortion. Foam must be precisely cut to fit the stitch area, and digitizing for 3D work often involves planning multiple passes to build height gradually. Stabilizers back the fabric, prevent puckering, and keep the raised features in place during wear and washing.
3. 2D embroidery techniques for precision and small details
2D embroidery techniques focus on flat, precise surfaces that emphasize clean lines and legible text. This approach uses standard stabilizers such as cut-away or tear-away depending on fabric weight and stitch density, enabling sharp outlines and stable fills. The result is a low-profile finish that remains comfortable against the skin.
For 2D designs, emphasis is placed on balanced density and edge stability. Techniques such as satin and fill stitches are chosen to preserve legibility for small text and fine artwork. 2D embroidery is ideal for fabrics that require a soft hand and may not tolerate bulk, such as delicate shirts or lightweight linens, where a raised element could feel bulky or snag easily.
4. Digitizing strategy and stabilizers for successful 3D vs 2D projects
A successful 3D project starts with careful digitizing that guides the machine through layering and height. Designers should specify padding thickness, underlay strategies, and stitch order so the dimensional effect is predictable and clean. For 2D projects, digitizing prioritizes precise outlines and balanced fills to ensure crisp edges and legible details across different fabric types.
Stabilizers play a central role in both styles. 3D embroidery benefits from strong backing stabilizers to prevent shifting and distortion under padding, while 2D embroidery relies on appropriate cut-away or tear-away stabilizers to maintain flat surfaces. Selecting fabric type, thread choice, and stitch density during the planning phase helps avoid later adjustments after stitching.
5. Practical applications: when to use 3D embroidered designs in apparel, home decor, and signage
3D embroidered designs are particularly effective for logos and motifs that must pop from the fabric surface. They work well on caps, jackets, and promotional items where dimensional branding stands out across crowded displays. In signage and decor, raised elements catch light and create shadows that add texture and visual interest.
2D embroidery shines where precision and refinement matter most, such as small text, detailed lettering, or intricate edge work on cushions and apparel. A logo that combines 3D embroidery for the emblem and 2D embroidery for the slogan can achieve a balanced, adaptable look across different lighting and fabric textures, offering both impact and legibility.
6. Care, durability, and best practices for puff vs flat embroidery
Care and durability for both styles rely on proper care and the right backing. For padded 3D designs, avoid heavy friction that could compress padding or flatten raised features, and turn garments inside out when possible during washing. Stabilizers and appropriate thread choices contribute to long-term durability, with cotton and polyester blends performing well when backed correctly.
2D embroidery tends to withstand washing well when backed by sturdy stabilizers and balanced stitch density. To maximize longevity, match fabric weight, stabilizer type, and stitch density to the chosen design. When using puff embroidery, test padding thickness to ensure the final look remains readable and uncluttered on the garment, avoiding congestion that can reduce legibility and wearability.
Frequently Asked Questions
What are the key differences between 3D embroidery vs 2D embroidery in terms of depth and texture?
3D embroidery vs 2D embroidery centers on depth and texture. 3D embroidery adds height using padding materials (foam or felt) and layered stitches, creating a sculptural effect. 2D embroidery stays flat with a uniform surface, emphasizing clean outlines and crisp fills. This difference affects visibility and wear: 3D works best for bold logos and branding on caps or outerwear, while 2D keeps small details sharp and legible from a distance.
Which techniques and materials define 3D embroidery vs 2D embroidery?
3D embroidery techniques rely on padding materials (foam, felt) under the stitches, with layering fills and underlay to build height; puff embroidery is a common 3D subset. Stabilizers must prevent distortion and shifting. In contrast, 2D embroidery uses standard stabilizers (cut away or tear away) with precise outlines and balanced density to keep the surface flat and durable.
What are the best use cases for 3D embroidered designs vs 2D embroidered designs?
3D embroidered designs excel for logos that must pop—caps, jackets, team apparel, and promotional items—leveraging height and tactile texture. 2D embroidered designs are ideal for detailed lettering, small text, and fine logos where readability and a refined look matter, especially on lighter fabrics. In practice, many projects blend both styles to balance impact and detail, depending on the product and viewing distance.
How does digitizing differ between 3D embroidery vs 2D embroidery?
Digitizing differences: 3D embroidery vs 2D embroidery often require layering the design into multiple passes, specifying padding thickness, and sequencing stitches to build height without distortion. It may involve separate padding layers and underlay strategies to maintain edge control. 2D digitizing focuses on precise outlines, balanced fill density, and reliable stitch direction to keep the surface flat. Always test swatches on the actual fabric before production.
What care and durability considerations apply to puff embroidery vs flat embroidery?
Care and durability: Puff embroidery is a common 3D technique and padding can compress over time, so avoid aggressive friction and wash inside out following care labels. Use suitable stabilizers and seam allowances to preserve the raised elements. 2D embroidery typically handles washing well when backed by sturdy stabilizers and balanced density. The fabric and thread choice also influence long-term durability for both styles.
What practical tips help decide between 3D embroidery vs 2D embroidery for logos, lettering, and branding?
Practical tips for choosing between 3D embroidery vs 2D embroidery for logos, lettering, and branding: assess viewing distance and environment—3D and puff work best up close or from afar where depth adds impact. Consider fabric type and wearability; 2D may be better on soft or delicate fabrics and for small text. Run a pilot on scraps or swatches to compare texture, legibility, and overall presence. When appropriate, combine methods (3D for the emblem, 2D for the slogan) to balance visibility and refinement, and plan the digitizing approach accordingly.
| Aspect | 3D embroidery | 2D embroidery |
|---|---|---|
| Definition | Raised stitch work with padding under the stitches; adds height and dimension. | Flat surface with uniform fills; emphasizes clean lines and precise details. |
| Depth | Creates noticeable height and sculpted features. | Remains flush with fabric for a smooth silhouette. |
| Texture | Raised stitches catch light and invite touch; more tactile. | Flat texture with even surface; detail remains crisp but less tactile. |
| Weight & stiffness | Padding increases fabric stiffness and can affect drape. | Lower weight, preserves fabric flexibility and softness. |
| Cost & production time | Generally higher due to padding and more complex digitizing. | Typically lower, with faster production and simpler digitizing. |
| Techniques & materials | Uses padding materials (foam, felt); puff variations are common; layered fills. | Relies on standard stabilizers and traditional thread/stitch types; no added padding. |
| Stabilizers | Strong backing stabilizers to prevent distortion and padding shift. | Cut-away or tear-away stabilizers appropriate for fabric and density. |
| Ideal uses | Logos, team motifs, and branding that should pop from the surface (caps, outerwear). | Detailed lettering, small text, and fine logos where precision matters. |
| Digitizing guidance | Plan multiple passes; specify padding thickness and underlay/stitch order. | Focus on clean outlines and balanced fills with attention to edge stability. |
| Care & durability | Padding can compress with heavy friction; follow care labels; avoid aggressive rubbing. | Generally robust with proper stabilizers; less risk of distortion on soft fabrics. |
| Suitable fabrics & tips | Best on sturdy bases like caps, jackets; consider padding selection for bulk. | Better on delicate or soft fabrics where edge stability remains key without bulk. |
| Common pitfalls | Too much padding, leading to bulking and edge distortion; insufficient stabilization. | Overly dense fills or bulky outlines can cause puckering on lightweight fabrics; stabilize appropriately. |
Summary
Conclusion: 3D embroidery vs 2D embroidery presents distinct outcomes in texture, depth, and readability, guiding designers to choose based on impact, durability, and fabric behavior. If bold branding and tactile presence are the goal, 3D embroidery (often with puff or foam padding) delivers maximum visual impact across caps, jackets, and signage. For precise lettering, clean lines, and refined detail, 2D embroidery remains the more reliable choice on a wide range of fabrics. Both approaches have a place in modern embroidery workflows; by understanding differences, planning digitizing strategies, and testing on actual fabrics, you can achieve results that balance texture, depth, readability, and durability while meeting wear-and-care expectations. This balanced approach supports effective branding in apparel, home decor, and signage, highlighting how 3D embroidery vs 2D embroidery offers a spectrum of options for achieving the desired look and performance.