
3D embroidered designs bring texture, personality, and durability to everyday wear, turning ordinary garments into tactile stories that invite touch and linger in memory, elevating both casual looks and curated outfits. Across jackets, bags, and hats, 3D embroidery on jackets demonstrates how raised motifs add depth and movement to everyday pieces, standing up to regular washing, folding, and outdoor use while keeping a refined silhouette. Designers lean on three-dimensional embroidery techniques to build dimension with padding, layered stitches, and precise color shifts that read differently from every angle, letting light play across stitched surfaces and revealing subtle gradients. This approach extends beyond clothing, bringing embroidered textures to accessories and surfaces that benefit from a tactile focal point, such as embroidery designs for bags and hats, which can unify a collection with consistent texture and color stories. As a source of inspiration, consider 3D embroidery ideas that fuse natural textures with geometric forms to spark unique, wearable art, from bold back-panel florals to restrained caps with raised monograms.
In other words, this craft emphasizes raised, padded stitching that adds form and shadow to fabric surfaces. Think of it as sculpting fabric with thread, where dimension is created through foam, layers, and careful color work rather than flat embroidery. LSI-friendly terms such as textured applique, volumetric stitching, and sculpted motifs help search engines connect these ideas to fashion, accessories, and practical care. By pairing searches for raised embroidery with materials and wearability, creators can attract readers seeking inspiration for jackets, bags, hats, or decorative home textiles.
What Are 3D Embroidered Designs and Why They Transform Wearables
Three-dimensional embroidered designs are raised, tactile motifs that literally lift off the base fabric, adding depth, texture, and lasting impression to clothing and accessories. When applied to jackets, bags, and hats, these motifs transform simple silhouettes into wearable art by creating shadows, highlights, and a sense of movement that draws the eye. The result is not only visually striking but also more durable, as the padding and layered stitches provide a protective buffer against wear and abrasion.
In practice, 3D embroidered designs open opportunities to mimic natural textures—petals, feathers, scales—or to craft bold geometric forms that become a garment’s signature. This approach blends craft with fashion, offering a tactile dimension that flat embroidery cannot. This guide introduces core concepts, materials, and design ideas to help you start or elevate a project with 3D embroidery ideas and related techniques.
3D Embroidery on Jackets: Elevating Outerwear with Raised Motifs
Jackets are ideal canvases for 3D embroidery because they handle padding well and tolerate dense stitching. By using padding behind motifs, denim and other sturdy fabrics gain structured volume, turning a plain jacket into a statement piece. Padded embroidery, foam backing, and layered stitches help the design stay upright through daily wear and wash cycles, making the result both eye-catching and durable.
When planning 3D embroidery on jackets, placement matters. Large back panels, shoulder accents, or sleeve motifs can anchor a collection’s visual story, while carefully chosen colors and shading add depth. The added texture also enhances comfort under layering, inviting touch and interaction with the garment rather than mere visual appeal.
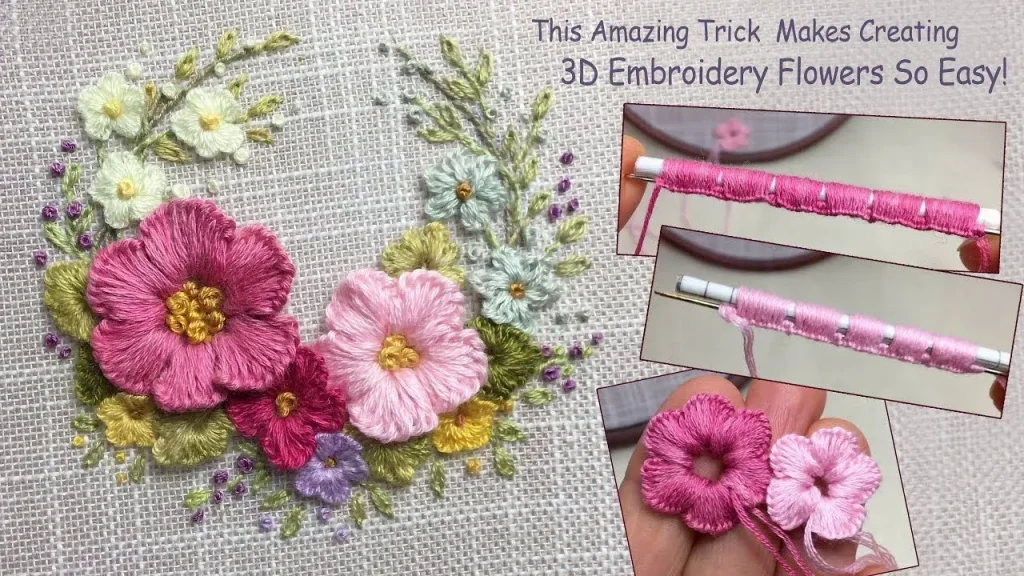
Three-Dimensional Embroidery Techniques for Rich Texture
To achieve depth, crafters combine several techniques that create true 3D effects. Core methods include padded embroidery, where foam or heavy stabilizer sits behind the motif; raised appliqué, which lifts fabric shapes off the base; and layered stitching that builds volume with micro-padding. Thick threads and chenille stitches further boost plushness, producing tactile surfaces that stand out on jackets, bags, and hats.
Additional techniques such as needle felting within embroidery and the use of foam padding with soft stabilizers expand the toolbox for 3D effects. Layering and strategic color stops help simulate light and shadow, while careful finishing prevents bulk from causing puckering. Mastery of these three-dimensional embroidery techniques enables designers to craft dimension that reads as art in motion.
Embroidery Designs for Bags and Hats: From Motif to Wearable Art
Bags and hats offer spacious, forgiving surfaces for bold 3D motifs. Embroidery designs for bags and hats benefit from stacked shapes, perched motifs, and edge-stitching that lifts elements away from the base fabric. The result is a focal point that remains visible from a distance and up close, while still tolerating everyday wear.
Design ideas for bags and hats range from framed florals and stacked fruit to abstract geometric forms. A 3D bird perched on a tote corner or a layered badge on a cap front can become a distinctive signature. For those seeking quick inspiration, start with a limited palette and a single large motif, then expand with complementary 3D ideas that carry the theme across multiple items.
Planning, Tools, and a Step-by-Step Workflow for 3D Embroidery Projects
A solid plan improves results and protects fabrics during 3D embroidery. Begin by sketching your motif, deciding how many layers you want for the lift, and choosing placement that avoids seams and zippers. Prepare the fabric with suitable stabilizers to prevent stretching and puckering, then test stitch on a scrap that matches the project material to refine padding thickness and color density.
A practical workflow guides consistency from concept to finished piece. Outline the design, apply padding, stitch the base shape, and gradually build up layers while alternating colors to create depth. Finish with trimmed edges and a gentle press from the back to set the stitches. Following these steps helps you translate 3D embroidery ideas into durable, wearable art.
Care, Longevity, and Common Mistakes in 3D Embroidery
Proper care extends the life of 3D embroidered designs on jackets, bags, and hats. Handwashing or gentle machine washing, as recommended by fabric labels, and avoiding high heat on padding areas help preserve padding materials and stitched edges. Turning garments inside out during washing reduces surface friction, while a cool, dry store environment minimizes fading and deformation of layered stitches.
Common mistakes to avoid include under-padding that leads to flattening, puckering at edges, color bleeding, and overcomplication from too many motifs in a small area. Solutions include adjusting padding height, stabilizing edges with firmer backing, testing colorfast threads, and starting with a single central motif before expanding. By acknowledging these pitfalls, you can keep 3D embroidered pieces looking crisp and vibrant season after season.
Frequently Asked Questions
How can I start with 3D embroidery on jackets using three-dimensional embroidery techniques?
Getting started with 3D embroidery on jackets means choosing a sturdy fabric (denim or canvas) and a cut-away stabilizer. Start with a simple motif, outline it, and add padding behind each section using foam or felt. Stitch the base shape with dense satin stitches, then build 1–2 layers of padding to create height. Finish edges with a tight satin or chain stitch. Practice on scrap fabric to dial in padding thickness and stitch density. These are core three-dimensional embroidery techniques that yield a durable, tactile design on garments.
What materials are essential for creating embroidery designs for bags and hats with a 3D embroidered designs look?
For embroidery designs for bags and hats aimed at a 3D embroidered designs look, select fabrics that hold padding well (canvas totes, cotton caps). Use a stable backing (cut-away stabilizer) and padding such as lightweight foam or felt. Choose polyester or rayon threads for strong coverage, and test combinations before final stitching. Apply raised motifs with padded embroidery techniques, and keep padding height balanced so the design sits evenly on curved surfaces.
What is a practical step-by-step workflow for turning 3D embroidery ideas into a finished piece?
Turn 3D embroidery ideas into a finished piece with a simple workflow: plan the motif and layers, stabilize the fabric, outline the design, place padding behind each area, stitch the base silhouette, build up layers with additional padding and color, and finish edges with a tight stitch. Finally, press gently with a cloth. This approach keeps padding even and ensures dimension translates well to jackets, bags, or hats.
How should I care for and maintain 3D embroidered designs on jackets, bags, and hats to maximize longevity?
Care for 3D embroidered designs by following fabric care labels: hand wash or gentle machine wash, mild detergent, and avoid high heat on padding. Turn items inside out to reduce wear on raised elements, air dry, and store away from direct sun. Periodically inspect padding and edges; trim loose threads and re-stitch if needed to maintain the crisp, dimensional look over time.
What are common mistakes when applying three-dimensional embroidery techniques to jackets, and how can I avoid them?
Common mistakes in three-dimensional embroidery techniques include under-padding, puckering at edges, color bleeding, fraying, and overcomplication. Avoid them by testing padding heights on scraps, stabilizing edges with firmer backing, choosing colorfast threads, using appropriate tension, and keeping motifs simple on smaller items. Start with one central 3D motif and add secondary shapes as you gain experience.
How can I develop a cohesive collection using 3D embroidery ideas across jackets, bags, and hats?
Develop a cohesive collection by starting with a unifying color story and a small set of core motifs that work across jackets, bags, and hats. Plan consistent placements, use similar padding heights, and map each motif to multiple items. Create prototypes on representative fabrics, document the steps, and adjust scale to maintain balance. This approach helps 3D embroidery ideas feel intentional and wearable across an entire collection.
| Topic | Key Points |
|---|---|
| What are 3D Embroidered Designs? | – Raised from base fabric using padding, foam, or felt – Create depth and volume beyond flat embroidery – Can be focal points or recurring motifs on jackets, bags, and hats – Lifts stitches off the fabric to add texture and dimension. |
| Why they matter for jackets, bags, and hats | – Offer tactile appeal and greater durability than flat embroidery – Padding adds a buffer against wear, improving longevity – Enable expression of personality through layered textures and color blends – Can mimic natural textures (petals, feathers, scales) or form distinctive geometric motifs. |
| Techniques Behind 3D Embroidered Designs | – Padded embroidery with foam or stabilizer and raised stitches – Needle felting within embroidery for volumized bumps – Raised appliqué with edge-stitching – Thick thread/chenille stitches for plush texture – Layered stitching and micro-padding for multi-layer look – Foam padding and soft stabilizers for resilience and washability. |
| Choosing Materials for 3D Embroidered Designs | – Fabrics: Denim, canvas, cotton caps; stabilize/stretch as needed – Threads: Polyester, rayon; metallics with caution around padding – Stabilizers: Cut-away for dense padding; tear-away for lighter padding – Padding: Lightweight foam, felt, soft batting – Needles and settings: Sharp/triple-stitch needles; adjust tension and stitch length to reduce bulk. |
| Design Ideas for Jackets, Bags, and Hats | – Jackets: large 3D floral panel on back or shoulder-focused geometric motifs – Bags: stacked shapes like fruit or birds; 3D patches on pockets or corners – Hats: small motifs around crown or bill; monograms with subtle shading – Thematic collections: coordinated 3D motifs across items for a cohesive look. |
| Planning Your 3D Embroidered Designs Project | – Sketch motif and plan how many layers – Place motifs to avoid seams and edges – Prepare fabric with stabilizer to prevent distortion – Test stitch on similar fabric to refine padding and color density – Map color stops to create depth with highlights and shadows. |
| Step-by-Step Guide to Creating 3D Embroidered Designs | 1) Prepare and stabilize fabric; 2) Outline design with water-soluble pen; 3) Apply padding under sections; 4) Stitch base shape; 5) Build up layers with more padding and color; 6) Finish edges with tight stitches; 7) Press carefully from the back. |
| Care, Maintenance, and Longevity | – Handwash or gentle machine wash as per fabric care label – Use mild detergent; avoid high heat on padding areas – Turn garments inside out for washing – Store away from direct sun; inspect padding and re-stitch as needed – Trim loose threads to maintain crisp 3D effects. |
| Tips for Beginners and Advanced Crafters | – Start with small motifs to build confidence – Practice color blending for depth – Combine with rhinestones or beads sparingly – Keep padding samples for quick reference – Document process with photos for future projects. |
| Inspiration and Resources | – Seek patterns inspired by nature, geometry, or cultural motifs – Explore online tutorials, embroidery communities, and fashion blogs for ideas, stitch patterns, and troubleshooting tips – Consider how a motif will move with wear on jackets, bags, or hats. |
| Common Mistakes and How to Avoid Them | – Under-padding: increase padding gradually and test on scraps – Puckering at edges: stabilize edges; adjust tension/density – Color bleeding/fraying: use colorfast threads; test swatches – Overcomplication: start with one central motif and one or two supporting shapes. |