
3D embroidery transforms fabric into tactile art by building volume through padding, layered stitches, and selective underlays, so the surface reads as a sculpted relief rather than a flat decoration, inviting close inspection and a gentle touch, with these layers interacting with stitching density to modify bounce, shadow, and sparkle as garments move. Exploring 3D embroidery techniques, designers layer padding with satin stitches, foam underlays, and strategic color shifts to craft petals, buds, or geometric forms that rise from the base fabric and cast subtle, interactive shadows; this approach also helps ensure durability while maintaining flexibility for wearers. Traditionally seen on accessories like embroidered pouches and embroidered bags, 3D effects give a practical item a gallery-worthy twist that remains wearable for daily use, and crafters appreciate how texture and dimension elevate simple zippers, seams, and closures. For designers, a single motif can become the centerpiece of a project, translating 3D embroidery designs into practical items that spark conversations and express personal style; this fusion of craft and form appeals to makers and small businesses alike. Whether you are learning at home or turning a hobby into a side business, exploring 3D embroidery designs through DIY embroidered accessories opens opportunities to create distinctive, collectible pieces and even inspires gifts, fashion experiments, and home décor ideas for small-scale projects.
In other terms, this approach is texture-rich stitching that lifts motifs from the fabric using padding, layered underlays, and a sturdy backing to create true depth and tactile interest. Often called raised embroidery or volume stitching in craft circles, it gives textiles a sculptural quality and works beautifully on everyday items like pouches and bags. LSI-friendly planning focuses on material weight, padding thickness, stabilizer choice, and color interactions to keep the raised shapes crisp through handling while avoiding fabric distortion. With careful finishing and secure stitching, designers can translate these ideas into practical products that feel premium and stand out in online catalogs or marketplaces. Readers may experiment with different textures—from soft felts to rigid foams—to explore how light and shadow play across lifted forms.
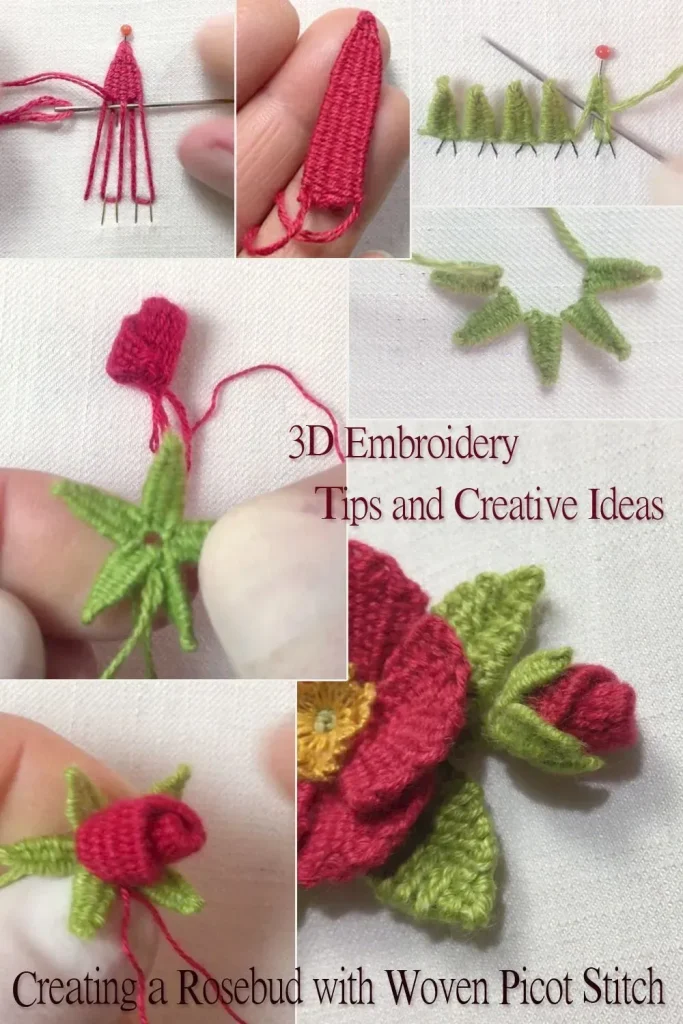
What is 3D embroidery and why it adds depth to accessories
3D embroidery takes traditional surface stitching and builds volume by layering stitches over padding, foam, or felt. The raised elements create shadows and texture that catch light, giving embroidered forms a tactile, sculptural quality on fabrics used for accessories.
This depth makes items like embroidered pouches and embroidered bags more interactive; with 3D embroidery designs, a single motif can anchor a bag strap or a pouch flap, turning a practical item into a small work of art that’s fun to touch and inspect.
3D embroidery designs for embroidered pouches: planning depth and impact
When planning 3D embroidery designs for embroidered pouches, start with the motif and how it will sit on the curved surface of the pouch or opening of a bag. Consider how padding will stack, where shadows will fall, and how the threads’ color can enhance dimension.
Choose a color palette that complements the base fabric and lining. Map out which elements will be padded and the order of layering so the final embroidery reads clearly from different angles on the accessory.
Key techniques for 3D embroidery on bags and pouches
There are several 3D embroidery techniques you can use to build volume on accessories: padded satin stitch to lift petals, foam or felt underlays for bold shapes, burst or stumpwork layers, and raised outlines achieved by couching thicker thread.
Bead and sequin accents can highlight centers or add sparkle, but place them deliberately to avoid crowding padding. Maintaining consistent padding thickness and stitch density helps the design stay durable on embroidered bags and pouches during regular use.
Tools and materials for DIY embroidered accessories
To equip yourself for DIY embroidered accessories, gather suitable fabric and backing (light to medium weight cotton or blends), stabilizers, padding, and a selection of threads. This project style benefits from a mix of cotton or rayon embroidery floss, and a few metallic threads for added depth.
You’ll also need appropriate needles, sharp scissors, water-soluble markers, and finishing supplies like zippers and linings designed for pouches or bags. Using a sturdier backing and a cut-away stabilizer helps preserve the raised elements during wear.
From concept to creation: designing and transferring 3D embroidery for pouches and bags
Designing for pouches and bags starts with choosing motifs that work with the item’s shape and closure. Floral designs or geometric shapes translate well into 3D effects, with padding placed to emphasize petals or facets on the surface.
Transfer the design accurately, prototype on scrap fabric, and plan padding thickness and layering before stitching. Consider how the embroidery will sit near seams or zippers so the raised areas remain visible when the accessory is opened or worn.
Care, maintenance, and creative ideas for 3D embroidery on accessories
Care for 3D embroidered accessories relies on gentle handling. Hand washing in cold water is often safest, followed by air drying and careful storage to protect raised elements and padding from crushing.
Beyond pouches and bags, these techniques adapt to DIY embroidered accessories like wallets, phone sleeves, or journal covers. Use the same principles of padding, layering, and thoughtful finishing to keep pieces durable and striking over time.
Frequently Asked Questions
What is 3D embroidery, and how does it enhance DIY embroidered accessories like embroidered pouches and embroidered bags?
3D embroidery adds volume to surface stitches by layering them over padding such as foam or felt. The resulting raised elements create shadows and texture that stand out on DIY embroidered accessories. This technique turns motifs into a sculptural focal point on embroidered pouches and embroidered bags.
Which 3D embroidery techniques are most effective for adding depth to embroidered pouches and embroidered bags?
Key 3D embroidery techniques include padded satin stitch, foam or felt underlay, burst or stumpwork, couching with raised outlines, and bead or sequin embellishments. Each method builds dimension differently, letting you tailor the look for embroidered pouches and embroidered bags.
What tools and materials do I need for 3D embroidery on embroidered pouches and embroidered bags?
Gather lightweight to mid-weight fabrics, stabilizers (cut-away or tear-away), padding such as foam or felt, embroidery threads (cotton, rayon, or metallic), appropriate needles, scissors, marking tools, and finishing supplies like zippers and linings to complete embroidered pouches or bags.
How do I plan and create a 3D embroidery design for a DIY embroidered accessory such as a pouch?
Start with a motif suited to the item, decide which parts will be padded, and choose a color palette. Transfer the design, position padding under the raised areas, and prototype on scrap fabric before stitching the final embroidered pouch.
How should I care for 3D embroidered accessories to preserve the raised elements on pouches and bags?
Care for 3D embroidered items by washing gently in cold water, preferably by hand, then air dry. If machine washing is necessary, use a gentle cycle in a protective bag and avoid high heat which can flatten the padding; iron from the reverse side with a cloth to protect the raised elements.
What beginner-friendly 3D embroidery designs or projects can I try on a pouch or small bag?
Try a simple floral cluster with layered petals, a geometric bloom with stacked padding, or a tiny animal motif with raised features. These DIY embroidered accessories help you practice padding, stitching, and finishing before tackling more complex 3D embroidery designs.
| Topic | Key Points |
|---|---|
| What is 3D embroidery? |
|
| Techniques |
|
| Tools and materials |
|
| Design and planning |
|
| Step-by-step pouch project (summary) |
|
| Care and maintenance |
|
| Design ideas and inspiration |
|
| Applications beyond pouches and bags |
|
Summary
3D embroidery transforms fabric into tactile art by adding padding, layering stitches, and applying underlays to create tangible depth on everyday accessories. It moves beyond flat embroidery to produce raised petals, spheres, and sculpted shapes that invite touch and close inspection. This approach is especially popular for embroidered pouches and bags where the dimensional details can be appreciated from close up. By combining a variety of techniques with thoughtful design, the right tools, and careful finishing, you can design and sew unique 3D embroidery accessories that balance practicality with artistic expression. Whether you are new to 3D embroidery or expanding existing skills, experimenting with padding thickness, color layering, and embellishments can lead to stunning results that stand out in the world of textile crafts.