
If you’re new to garment customization, UV DTF transfer guidelines are essential for achieving crisp images with long-lasting results. This approach blends Direct-to-Film printing with UV-curable inks, and it aligns with UV DTF transfer temperature guidelines to help you fine-tune heat, time, and pressure for a reliable finish. For beginners, following DTF press guidelines for beginners can prevent common mistakes while you learn heat, pressure, and timing. You’ll also find actionable DTF printing tips woven with notes on UV printing and DTF settings to keep color fidelity, edge sharpness, and durable bonding across fabrics. Finally, the guide explains how to apply DTF transfers effectively and consistently, turning first projects into scalable workflows you can reuse.
From an LSI perspective, these guidelines map to broader terms such as UV-to-film transfer best practices, UV-curable ink bonding strategies, and print-on-fabric workflows that emphasize reliable adhesion. You can think of the process as a controlled heat-activation of UV inks on a film-then-fabric interface, where temperature, dwell, and pressure still rule outcomes. Other related phrases include direct-to-film with UV-curable inks, UV-printed transfers, and UV-assisted bonding techniques, all pointing to the same goal: crisp detail and wash-fast durability. Using these LSI-aligned terms helps you research, document, and optimize your results across different fabrics and print runs.
1. Understanding UV DTF transfers: what they are and how they differ from traditional methods
UV DTF transfer combines Direct-to-Film printing with UV-curable inks, then uses heat to bond the design to fabric. This approach delivers sharp edges, bright colors, and durable finishes, especially on cotton and blends, by leveraging rapid UV curing alongside a bonding layer. Compared with traditional DTG, pigment inks, or solvent-based systems, UV-curable inks cure quickly under UV exposure, which can influence how the image sits on the surface and how it bonds during heat application.
For beginners, understanding these differences helps tailor your UV DTF transfer guidelines to achieve consistent results. Edge definition, color fidelity, and bonding strength can vary with UV inks, film, and fabric type, so it’s important to test and document each combination. By starting with a clear foundation on how UV DTF transfers behave, you can approach your first projects with a plan for testing, adjustments, and reliable outcomes.
2. Core variables for success: temperature, pressure, and time
The three core variables—temperature, pressure, and time—drive how well the ink bonds to the garment and how the adhesive interacts with the fabric. Each factor influences edge sharpness, color retention, and wash durability, making careful testing essential for consistent results. Beginners should establish a small, repeatable test workflow to map how changes in one variable affect the final transfer.
A practical testing approach is to start with baseline settings, record outcomes, and adjust in small increments. Keep notes on fabric type, ink/film combination, and platen size so you can reproduce successful results later. This disciplined method aligns with common DT F settings for beginners practices and helps you build a reliable reference library for future projects.
3. Temperature guidelines for UV DTF transfers
Following UV DTF transfer guidelines, start with a conservative mid-range temperature—typically 300°F to 320°F (150°C to 160°C)—to balance ink curing with fabric sensitivity. This range minimizes scorching and edge distortion on common garments like cotton and cotton blends, and a brief preheat helps remove moisture pockets for an even transfer.
For heavier fabrics or larger designs, you may need up to 330°F (165°C) within safe limits, but always validate with test samples. Lighter fabrics and delicate blends often respond better to the lower end of the range, with shorter dwell times to reduce color bleed. Document the exact temperature and dwell time that produced the best adhesion to build a repeatable baseline.
4. Achieving consistent adhesion: pressure and dwell time
Pressure influences how evenly the transfer bonds across the garment. Start with a mid-range setting suitable for most home presses, ensuring uniform contact to prevent uneven edges or ghosting. For thin fabrics or small designs, slightly reduce pressure; for thicker items, increase it a notch to maintain full contact.
Dwell time—the duration under heat—drives curing and bonding. A common starting point is 15–20 seconds at the target temperature, with adjustments in small increments (2–5 seconds or 5–10°F) based on test results. After pressing, allow a brief cooldown before peeling to minimize shifting and edge lift, and log your findings for consistent future transfers.
5. Materials, setup, and workflow for beginner-safe results
Choosing the right materials is as important as the settings. Use UV DTF films and inks designed to work together, and select a compatible bonding layer if your workflow requires it. A release sheet or silicone sheet helps distribute heat evenly and prevents sticking, while pre-pressing removes moisture to improve image fidelity.
A practical beginner workflow includes designing with proper resolution, printing a test on the carrier film, applying any bonding layer as directed, and carefully aligning the film on a flat garment. Preheat briefly, then press at the baseline temperature and pressure, followed by a controlled cooldown and a careful peel. This process aligns with general DT F tips and emphasizes repeatable steps you can optimize over time.
6. Troubleshooting and optimization: common issues and strategies
Common issues include ghosting, ink cracking, color bleed, and edge lifting. If edges appear faint, revisit temperature and dwell time, making gradual adjustments and retesting on fabric swatches. Cracking or flaking usually points to too- high heat or over-dwell; reduce one variable at a time and document the change.
Bleeding colors and uneven transfers often result from excessive pressure or misaligned film. Ensure a flat garment surface and proper film alignment, and consider a dedicated garment pressing pillow for seams. Regular maintenance—calibrating the heat press, cleaning the platen, and storing films properly—helps sustain reliable UV printing and DTF settings across many shirts and bags.
Frequently Asked Questions
What are UV DTF transfer guidelines for beginners and how do I start with them?
Begin with the core UV DTF transfer guidelines: start with a conservative temperature of 300–320°F (150–160°C), use mid-range pressure for an even contact, and dwell for 15–20 seconds. Preheat the garment for 2–5 seconds and always run a test transfer on a scrap fabric to establish a reliable baseline. Document the settings that give the best adhesion for your ink and film to reproduce them consistently.
What are UV DTF transfer temperature guidelines for different fabrics?
Temperature should be adjusted by fabric weight and type. Heavier fabrics or dense designs may require up to 330°F (165°C), while lighter fabrics or delicate blends are safer at the lower end around 300°F. Always test with fabric swatches, and include a brief preheat (2–5 seconds) and a 15–20 second dwell as your baseline, then refine based on adhesion and edge quality.
What are DTF press guidelines for beginners when applying UV DTF transfers?
Use a mid-range, even pressure across the platen and ensure the garment is flat. For thin fabrics, reduce pressure slightly; for thicker items, increase it modestly. Place a silicone or Teflon release sheet between the film and fabric to promote even heat transfer, pre-press the garment to remove moisture, then press at the baseline temperature and dwell time before a controlled cooldown and gentle film removal.
What are essential DTF printing tips to improve UV printing and DTF settings?
Key tips include preparing design files with proper resolution and color management for UV inks, ensuring film and ink compatibility, and printing a test design on UV DTF carrier film. Pre-press to remove moisture, align the transfer accurately, and use a release sheet to prevent sticking. Keep a log of results to optimize settings for different fabrics and designs.
How do UV printing and DTF settings influence transfer results and what adjustments should I make?
UV-curable inks cure rapidly under UV light, which can affect edge sharpness and bonding. Adjust your temperature, dwell time, and pressure based on observed results, ensuring good adhesion without scorching. Always verify film/ink compatibility, calibrate your heat press, and document any correlations between fabric type and the optimal settings to maintain consistency.
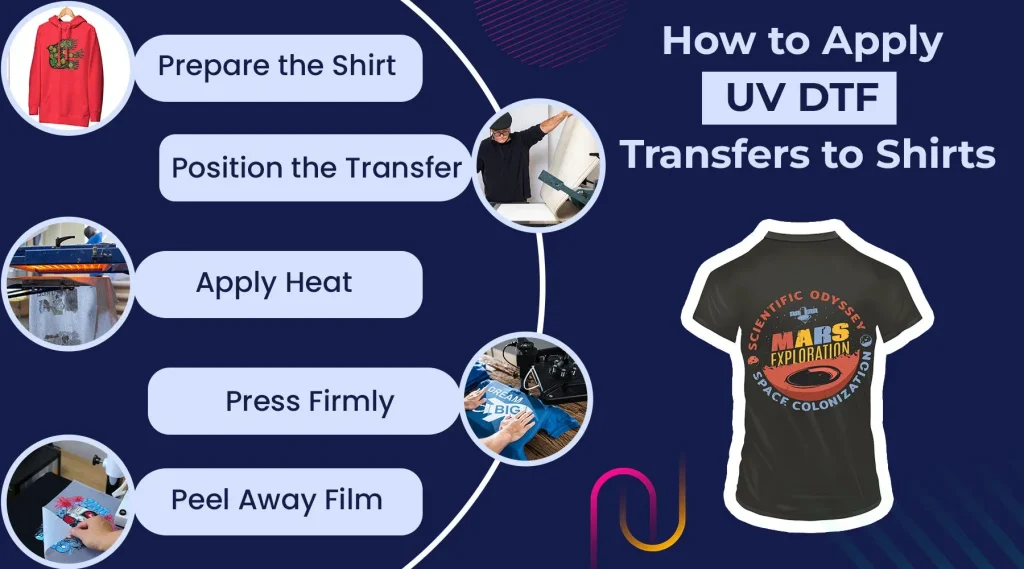
How to apply DTF transfers using UV DTF transfer guidelines?
Follow a practical workflow: design with proper resolution, print on UV DTF film, apply any bonding layer if required, and align the film on the garment. Preheat for 2–5 seconds, set the baseline temperature and pressure, and press for 15–20 seconds. Allow a 5–10 second cooldown before lifting the garment and peeling the carrier film. Inspect for missed areas and re-press if needed, keeping notes of the results for future projects.
| Key Point | Summary |
|---|---|
| What is UV DTF transfer? | A modern variant of Direct-to-Film using UV-curable inks. Printed on a clear film, then bonded to fabric via heat. UV formulations cure rapidly under UV light, affecting transfer behavior compared with traditional inks. |
| Core variables | Temperature, pressure, and time drive adhesion, bonding, and durability. Test and document settings for each ink/film/fabric combination. |
| Temperature guidelines | Starting range: 300–320°F (150–160°C); up to 330°F (165°C) for heavier fabrics. Lower temps for delicate fabrics. Brief preheating (2–5 seconds) helps even transfer. |
| Pressure guidelines | Start with mid-range pressure. Adjust for fabric weight; use a release sheet to improve even contact and reduce sticking. |
| Time/dwell guidelines | Common starting point: 15–20 seconds. For heavier fabrics or larger designs, 20–25 seconds. Cooldown 5–10 seconds before lifting. |
| Materials and setup | Use UV DTF films and inks designed to work together. Pre-wash garments, use protective release sheets, and perform a quick pre-press (3–5 seconds) to remove moisture. |
| Workflow (beginner) | Design prep → print test → apply bonding layer (if needed) → align → preheat → press at baseline settings → dwell → cooldown → peel and inspect. |
| Common mistakes & fixes | Ghosting, cracking, bleeding, uneven transfer, adhesive residue. Tweak temperature/time/pressure in small increments and ensure film alignment. |
| Maintenance & calibration | Regularly calibrate heat press temperature, clean platen, store films/inks properly, and maintain tension on feed paths to prevent misregistration. |