
Turn Your Artwork into Custom Shirts opens a doorway to wearable art that lets your creativity travel from canvas to closet. Designed for non-designers, this guide translates ideas into practical steps for turning sketches into print-ready designs for apparel, bridging art to apparel. You’ll discover design tips for beginners, how to prepare art for t-shirt printing, and how to choose printing methods that keep the process simple. The approach emphasizes readability, bold contrast, and a focused focal point so your designs translate well from screen to shirt. By the end, you’ll have a clear, repeatable path to create high-quality, eye-catching shirts that showcase your art.
Equivalently, think of turning your designs into wearable graphics that live on T-shirts and other garments. This art-to-apparel mindset aligns with practical LSI terms like graphic tees, garment printing, and scalable artwork that reads well at a distance. Using these terms helps non-designers relate the process to familiar concepts such as color separation, printing methods, and budget-friendly production. By reframing the project as apparel graphics rather than a single image, you can plan iterations and variations with confidence.
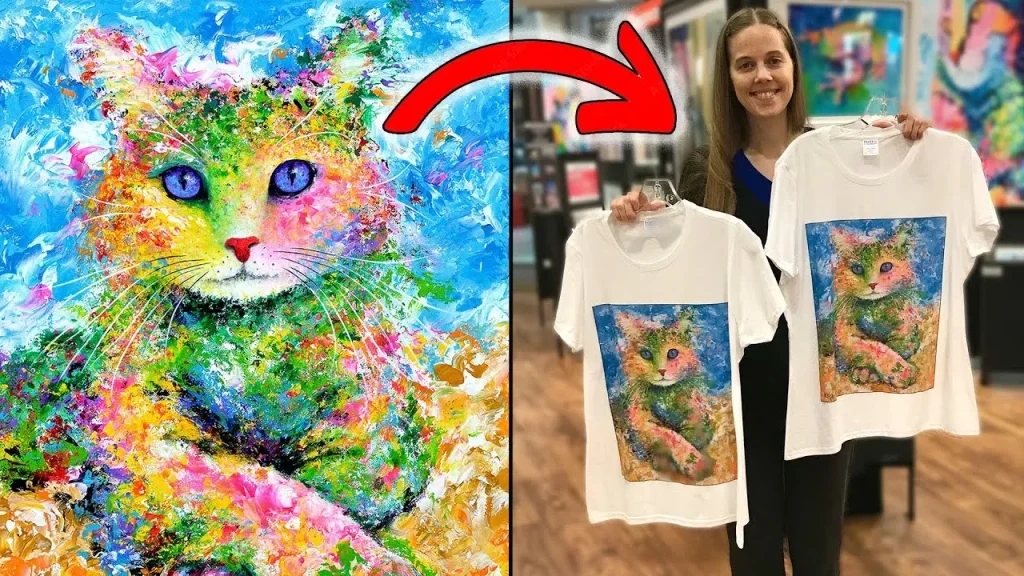
Turn Your Artwork into Custom Shirts: A Beginner-Friendly Path from Concept to Print
For non-designers, turning your art into wearable products starts with a clear concept and a practical printing plan. This approach aligns with the idea of art to apparel and helps you translate creativity into something customers can wear—without needing a studio-grade design background. By focusing on a repeatable process from concept to print, you can maintain your unique style while producing consistent, print-ready results for custom shirts.
Begin by defining your audience, desired shirt color, and the printing method you’ll use. Planning beforehand reduces revisions and keeps your workflow focused on what prints well on fabric. If you’re exploring t-shirt printing as a small business or personal project, the goal is to create high-quality, market-ready designs that translate well from screen to garment.
Understanding Printing Methods: DTG, Heat Transfer, and Screen Printing for T-Shirt Printing Success
There are several common printing methods to consider when turning art into apparel: direct-to-garment (DTG), heat transfer (including vinyl and transfers), and screen printing through a print partner. Each option has strengths and trade-offs that matter for custom shirts, so non-designers can choose a method that matches their artwork, budget, and production volume.
DTG offers full-color detail and is friendly for small runs, while heat transfer can be a quick DIY option for bold shapes. Screen printing is durable and scalable for larger orders but may require more upfront adaptation of artwork. For beginners, starting with DTG or heat transfer keeps the learning curve manageable, with screen printing later as demand grows.
Preparing Print-Ready Artwork: Files, Color, and Transparency for Apparel
A successful shirt design starts with a print-ready file. Prepare artwork with considerations for t-shirt printing: aim for high resolution (at least 300 DPI for raster work or scalable vector formats), and choose appropriate color modes. For many projects, RGB works in home workflows, but confirm the printer’s preferred color space to avoid unexpected shifts in color.
Transparent backgrounds and clear font handling are essential when printing on diverse shirt colors. Export logos or artwork with transparency as PNGs for raster workflows or keep vector formats (SVG/EPS) for scalable prints. Color separation and layering are also important—plan how each color will print, especially if you’re targeting screen printing, where each color may require its own screen.
Design Tips for Beginners: Boost Readability and Impact in Custom Shirts
Design tips for beginners emphasize simplicity, bold shapes, and strong contrast to ensure your artwork reads well on fabric. Tiny lines and micro-shading can disappear during printing, so convert fine textures into crisp, bold elements that stay legible at shirt size.
Limit your color palette to balance print quality and cost, and place emphasis on a clear focal point. If your design includes text, choose a bold, legible typeface and ensure the typography remains readable when printed on a shirt. By prioritizing readability and printability, non-designers can achieve professional-looking results and gradually tackle more complex artwork.
A Practical Non-Designer Workflow: From Sketch to Shop-Ready Shirts
This practical workflow is designed for non-designers who want a repeatable process from idea to finished product. Start with a rough concept, then digitize and simplify the artwork, reducing the color count to align with printing constraints. The goal is to capture the essence of your art while keeping the file print-ready.
Next, create mockups on multiple shirt colors to test contrast and placement. Choose a printing method based on the test results, then produce a small batch for quality checks. Regular communication with the printer and clear file specs help ensure the final shirts look as intended and reduce reprints.
Choosing Shirts, Placement, and Sizing: How to Elevate Artwork in Art to Apparel
Shirt color, fabric quality, and placement dramatically affect how your design reads. Lighter shirts typically showcase vibrant prints, but consider the interplay between ink, fabric, and texture to preserve your art’s character. Placement is often centered on the chest, but experimenting with sleeves or back prints can expand your line while maintaining consistency across sizes.
Mockups are essential for selling or presenting your design. Visualize scale and placement on different shirt colors and sizes to ensure your artwork remains impactful from small kids’ tees to adult sizing. By designing with scalable elements and avoiding overly tiny details, you’ll maintain readability and visual impact across the entire product range.
Frequently Asked Questions
What does it take for non-designers to Turn Your Artwork into Custom Shirts?
Turning your art into wearable shirts is achievable for non-designers. Start by choosing a printing method (DTG, heat transfer, or screen printing) and preparing a print-ready file (aim for 300 DPI, PNG with transparency if needed). Focus on simple shapes, high contrast, and a clean layout, then create digital mockups and test prints before producing a batch.
What are the main printing methods for Turn Your Artwork into Custom Shirts, and which is best for beginners in t-shirt printing?
Turn Your Artwork into Custom Shirts can use direct-to-garment (DTG), heat transfer, or screen printing. DTG is beginner-friendly for full-color art, heat transfer is quick for small runs, and screen printing shines at higher volumes. For beginners, start with DTG or heat transfer to learn the basics before exploring screen printing for larger runs.
What design tips for beginners should I follow to Turn Your Artwork into Custom Shirts?
Turn Your Artwork into Custom Shirts benefits from design tips for beginners like simplifying details, maximizing contrast, and limiting colors. Center the design on the chest, pick bold, legible type if text is involved, and ensure the artwork remains readable when scaled for shirts.
How should I prepare artwork for Turn Your Artwork into Custom Shirts to ensure high-quality prints, especially for art to apparel?
Prepare print-ready files for Turn Your Artwork into Custom Shirts by starting with a high-resolution image, using RGB color mode, and exporting in print-friendly formats. Save with a transparent background when needed, convert text to outlines, and plan color separations if using screen printing. Verify the file with your printer’s specs.
How do I plan shirt color, placement, and sizing when Turn Your Artwork into Custom Shirts?
When Turn Your Artwork into Custom Shirts, choose shirt colors that provide enough contrast, typically light shirts for bright art. Use centered placement and scalable design elements, and rely on mockups to visualize size across different shirt sizes. Keep the design readable and balanced on the garment.
What common pitfalls should non-designers avoid when Turn Your Artwork into Custom Shirts?
Common pitfalls to avoid with Turn Your Artwork into Custom Shirts include overcomplicating designs, ignoring print-spec requirements, and inconsistent color management. Also watch for poor font choices and ensure DPI, color mode, and file formats meet your printer’s needs.
| Topic | Key Points | Practical Tips |
|---|---|---|
| Goal & Audience | Translate existing artwork into a printable format; designed for non-designers with a practical, repeatable process from concept to print; aim for readable, durable designs that look good on T‑shirts and reach a wider audience. | Keep designs simple, test prints with partners, and communicate your needs clearly to printers to preserve your art’s character. |
| Printing Methods | DTG (Direct-to-Garment) supports many colors and gradients, best on light fabrics; Heat Transfer/Vinyl is DIY-friendly with bold colors but may feel less soft; Screen Printing is durable for larger runs and fewer colors. | Choose DTG for detailed artwork, transfers for small runs or personalization, and screen printing for cost-effective bulk prints; confirm with your printer about white underbase for dark shirts and color separation needs. |
| Preparing Artwork | Start with a print-ready file: high resolution (≥300 DPI) or vector; use RGB for most workflows; preserve transparency if needed; convert fonts to outlines; plan color separations based on the printing method; save as PNG (raster) or SVG/EPS (vector). | Ask printers for their preferred specs, keep files clean and organized, and include mockups to verify placement before production. |
| Design Tips for Beginners | Simplify complex details; emphasize strong contrast; limit color count; center design placement; ensure readability and legibility on apparel; use simple shapes and bold lines. | Test designs at shirt-scale, choose bold typefaces, and plan color separations early to avoid surprises. |
| Practical Workflow for Non-Designers | A repeatable six-step process: concept/draft → digitize/simplify → prepare the file → mockups/testing → choose printer/method → production QC. | Document each step, use templates, and run small tests before larger orders. |
| Shirts, Placement & Sizing | Shirt color and fabric affect print appearance; center chest is standard; consider scalable design for different sizes; mockups help buyers visualize fit and color interaction. | Use realistic mockups, plan for underbase needs on dark shirts, and design with scalable elements. |
| Common Pitfalls | Overly complex designs; ignoring printer specs; color shifts between screens and displays; difficult fonts that don’t print cleanly. | Verify DPI/color mode/file format with the printer and test prints to avoid costly reprints. |