
DTF Printing for Beginners opens the door to a simple, scalable way to create vibrant custom garments. This guide acts as a DTF transfer tutorial, outlining clear steps from artwork prep to the transfer itself. Think of it as a direct-to-film printing guide that walks you through the workflow, from file setup to curing. You’ll learn about essential DTF materials and supplies, how to prepare designs, and the best practices for a clean, durable finish. With the right tools and a solid DTF printing workflow, plus guidance on choosing a heat press for DTF, you can start confidently.
From a different angle, beginners can approach garment decoration using film-to-fabric transfers that rely on an adhesive powder and heat to lock the design in. This alternative framing keeps the core steps intact, including design preparation, printing, powder curing, and heat application, while using broader terms that tap into LSI concepts like substrate compatibility and workflow consistency. Think of it as a practical pathway to learn ink-on-film technology, the role of white ink when needed, and the balance between speed and quality. Exploring these concepts with everyday tools helps readers connect to the idea of a reliable printing workflow without overwhelming jargon. With hands-on practice, you’ll master the process across common fabrics and gain confidence in delivering durable, vibrant results.
DTF Printing for Beginners: A Step-by-Step Direct-to-Film Tutorial
DTF Printing for Beginners introduces a practical, hands-on path into direct-to-film workflows. This section mirrors a DTF transfer tutorial and translates the core steps—design preparation, printer setup, white ink usage where needed, powder application, curing, and the transfer itself—into clear, beginner-friendly actions.
Think of this as a direct-to-film printing guide for newcomers, designed to build confidence with simple projects and repeatable results. By the end, you’ll have a straightforward workflow, basic color management, and troubleshooting steps you can revisit before each batch.
DTF Printing Workflow: A Clear Direct-to-Film Printing Guide for Newcomers
DTF Printing Workflow outlines an end-to-end process for beginners, covering file preparation, color management, printing, powder application, curing, and the heat transfer. Following this structured sequence helps minimize mistakes and waste while building practical experience.
Throughout this section, you’ll see how a direct-to-film printing guide fits inside the broader DTF printing workflow, including tips on mirroring designs, ensuring sufficient white ink laydown, and validating layers before pressing.
DTF Materials and Supplies: Essentials for a Reliable Start
DTF materials and supplies essentials for a reliable start include a compatible printer, DTF film, DTF inks, adhesive powder, a heat press, and protective sheets. Getting these basics right sets the foundation for durable, vibrant transfers.
Organize your stock with safety and cleanliness in mind. Proper storage of films, powders, and inks reduces clogs and color shifts, supporting consistent results across the DTF printing workflow.
Heat Press for DTF: Mastering Temperature, Pressure, and Timing
Choosing a heat press for DTF means focusing on stable heat up, even pressure, and accurate timers. Start with a test print at approximately 165°C (330°F) for 15-20 seconds under medium pressure, adjusting for fabric type.
Use a silicone mat or teflon sheet to protect prints, and pre-press garments to remove moisture. A reliable heat press for DTF helps you reproduce sharp colors and strong adhesion during the DTF transfer.
DTF Transfer Tutorial: From File Prep to Final Transfer
In a DTF transfer tutorial you begin with artwork preparation, color separations, and a test print on DTF film, ensuring your white ink layers are properly ordered.
During transfer, follow the recommended dwell time, temperature, and pressure for your specific film and substrate. Finish with the recommended peel (hot or cold) and post-press cure if required.
Troubleshooting and Maintenance in the DTF Printing Workflow
Even with a solid setup, issues can crop up. In the context of the DTF printing workflow, identify symptoms such as color fading, white ink misregistration, or powder shedding, then apply targeted fixes.
Regular maintenance—cleaning print heads, inspecting heat press elements, replacing worn mats, and properly storing films and powders—protects print quality and equipment longevity across your DTF operations.
Frequently Asked Questions
DTF Printing for Beginners: What is the easiest first project to try with a DTF transfer tutorial?
Start with a small, simple design at 300 dpi on a single garment. Follow the basic steps from the DTF transfer tutorial: prepare the file (mirror image for transfer), print on DTF film using white ink when needed, apply adhesive powder while the ink is tacky, cure the powder, pre-press the garment, align the film, transfer with a heat press, and finally peel and cure as recommended. This DTF printing for Beginners workflow builds confidence and yields a durable result.
DTF Printing for Beginners: What are the essential DTF materials and supplies I need to get started?
Key DTF materials and supplies include a printer with white ink or a white ink add-on, DTF film, DTF inks, adhesive powder, a heat press for DTF, silicone or teflon sheets, a clean workspace, and design software. Also consider a curing method and a protective carrier sheet to protect prints during transfer.
DTF Printing for Beginners: How should I set up the heat press for DTF transfers (heat press for DTF)?
Set your heat press to about 160-170 C (320-340 F) and maintain a 15-20 second dwell time with medium pressure as a starting point. Pre-press the garment to remove moisture, then apply the DTF film, and perform the transfer with the recommended pressure. Always verify settings with a test strip and adjust for your materials.
DTF Printing for Beginners: What is the basic DTF printing workflow from design to finished print?
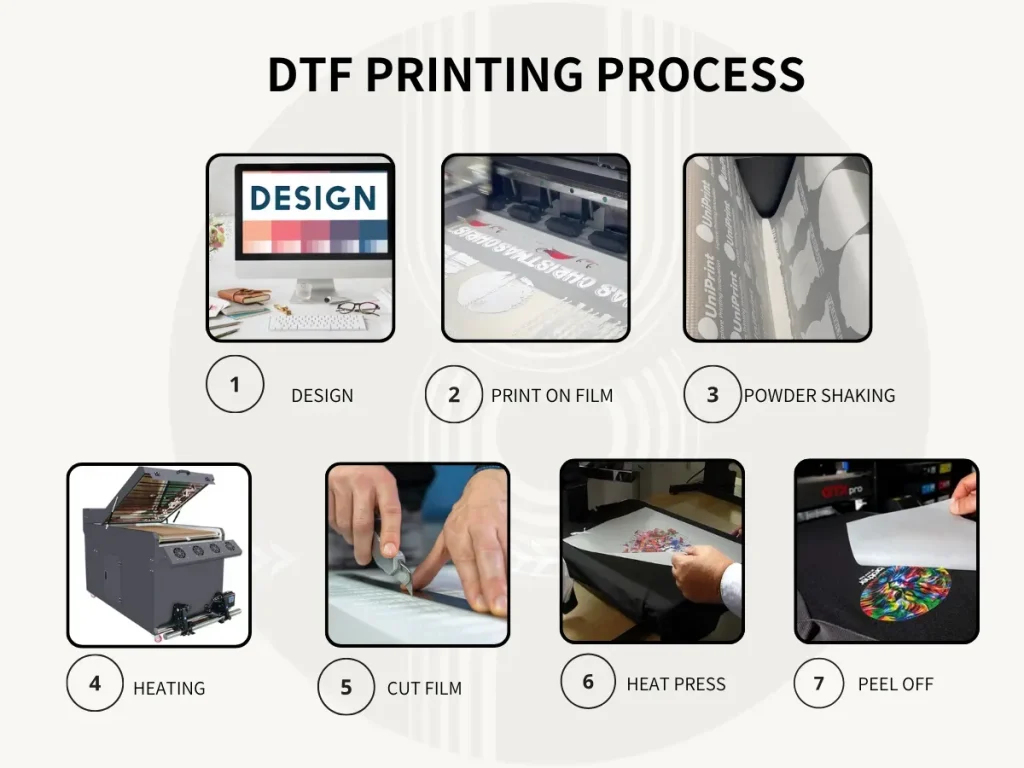
The basic DTF printing workflow starts with design prep (high contrast, 300 dpi, white layer handling). Print on DTF film, apply adhesive powder while tacky, cure the powder, pre-press the garment, align and transfer with heat, peel correctly (hot or cold per film), and finish with any post-press cure. This repeats as part of your DTF printing workflow for consistent results.
DTF Printing for Beginners: What common issues might I encounter and how can I troubleshoot them?
Common issues include fading colors, white ink not appearing, powder shedding after transfer, or color misalignment. Troubleshoot by checking ink quality and curing temperature, confirming white ink layering order, ensuring proper powder application and cure time, and verifying film alignment and pre-press accuracy. These checks align with the DTF printing for Beginners guidelines.
DTF Printing for Beginners: How does direct-to-film printing compare to DTG, and when should I choose direct-to-film?
DTF printing offers broad fabric compatibility, simpler color management, and typically lower costs for small-run projects, making it attractive for beginners. A direct-to-film printing guide suggests DTF is a strong all-rounder for many fabrics, while DTG may excel for ultra-soft handfeel on compatible fabrics. Choose direct-to-film when you need versatility across garments and efficient setup; consider DTG if your priority is a very soft hand on suitable fabrics.
| Aspect | Key Points |
|---|---|
| What DTF Printing for Beginners Means |
|
| DTF Transfer Tutorial Landscape |
|
| Essential Materials & Tools |
|
| Design & Print File Prep |
|
| Step-by-Step DTF Printing Process (Overview) |
|
| Practical Tips for Consistency |
|
| DTF vs DTG: Choosing Between Technologies |
|
| Troubleshooting & Maintenance |
|
| DTF Materials Quick Reference |
|
Summary
Conclusion