
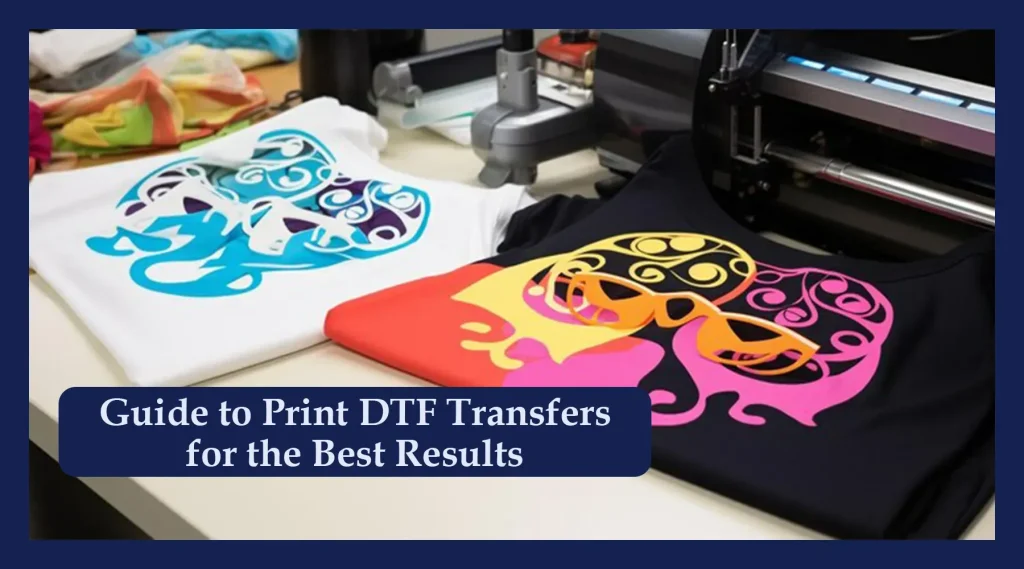
DTF Transfers have reshaped how designers and DIY enthusiasts decorate apparel, delivering vibrant color, crisp detail, and durable finishes across a wide range of fabrics. This DTF transfers guide introduces the core concepts, from preparation to finishing, and helps you plan a streamlined workflow for consistent results. If you’re learning how to apply DTF transfers, you’ll find practical tips that cover artwork setup, film handling, and heat-press alignment. Step-by-step guidance, sometimes called DTF transfer steps, helps you mirror designs, apply powder evenly, and time presses for clean edges. With additional insights on DTF printing tips and DTF heat press techniques, you’ll optimize adhesion, reduce waste, and extend the life of your prints.
Beyond the branded term, this technique is often described as direct-to-film printing—a film-based transfer method that uses heat and pressure to bond imagery to fabric. From an LSI perspective, terms like film-based transfer method, heat-press protocol, and durable adhesion connect related topics such as setup, curing, and aftercare. Using this broader vocabulary helps readers discover practical guidance on equipment, materials, alignment, and troubleshooting while keeping content accessible and discovery-friendly.
Frequently Asked Questions
What are the DTF transfer steps outlined in the DTF transfers guide?
Follow these core DTF transfer steps: prepare artwork and fabric (mirror image if required) and preheat the fabric for 3–5 seconds; set up the transfer with the film face down and secure with heat-resistant tape, applying adhesive powder if required; press at 150–160°C (302–320°F) for 12–15 seconds with medium to firm pressure and use a warm peel; perform any post-press steps and let the fabric cool; cure for 24–48 hours before washing.
According to the DTF transfers guide, how do you apply DTF transfers for best results?
Ensure correct orientation by mirroring when required, align precisely with a grid or markers, and then preheat the fabric. Place the printed transfer face down and secure with tape, follow the recommended temperature, time, and pressure, and peel the carrier warm for best adhesion and minimal edge sheen.
What are the top DTF printing tips for reliable heat press techniques?
Calibrate your heat press regularly to maintain stable temperature and pressure. Use a flat, clean workspace and test on fabrics similar to your final product to dial in temperature and time. Ensure even pressure across the transfer and follow the suggested peel method to minimize white edges and ghosting.
What common issues can arise with DTF transfers and how can you troubleshoot them (DTF transfer steps)?
Common issues include missing or faded colors, ghosting, cracking, and edges lifting. Check ink density and make sure the adhesive powder is evenly distributed, verify proper heat contact, and confirm precise alignment with tape. Reprint with balanced color, fine‑tune heat and time, and peel warm to reduce ghosting and edge lift.
What materials and tools are essential for a smooth DTF transfer workflow (DTF transfers guide)?
Essential gear includes a quality DTF printer or reliable vendor service, DTF transfer films and adhesive powder, a heat press with even pressure, a clean workspace, lint-free gloves, heat-resistant tape, a fabric preheater, and release paper or silicone sheets. Having these on hand lets you apply DTF transfers with confidence and minimizes variables.
How should you finish and care for DTF transfers to maximize durability according to the DTF transfers guide?
Allow the print to cure for 24–48 hours before washing. Turn garments inside out and wash on a gentle cycle in cold water with mild detergent. Avoid high-heat dryers initially, and consider a light follow-up press to seal edges and protect color, ensuring long-lasting results.
| Key Point | Summary |
|---|---|
| What are DTF Transfers? |
DTF Transfers are a modern printing method where a design is printed onto a special film and transferred to fabric using heat and pressure. They offer vibrant color, fine detail, and strong adhesion to a wide range of textiles, including cotton, polyester, blends, and some dark fabrics. |
| Core principles for successful application |
Key factors include precise image preparation, proper transfer film handling, and a consistent heat-press technique. Emphasis on alignment, temperature control, and timing ensures a durable finish that lasts wash after wash. |
| What you need for a smooth process |
|
| Step-by-step process |
|
| Temperature, time, and pressure specifics |
Typical range: Temperature 150–160°C (302–320°F); Time 12–15 seconds; Pressure medium to firm; Peel method: warm peel for best adhesion. |
| Post-press finishing & care |
After carrier removal, press again if required. Let cool completely. Cure 24–48 hours. Wash inside-out with cold water and mild detergent to preserve color and adhesive integrity. |
| Troubleshooting common issues |
|
| Optimization for consistency |
|
| Care and longevity of DTF Transfers |
Durability depends on application quality and post-care. Proper curing, washing at recommended temperatures, and gentle handling extend life. Avoid high-heat dryers during first wash; address edge fraying with light sealing if needed. |
| DTF Transfers vs other methods |
|
| Frequently Asked Questions |
|
Summary
DTF Transfers simplify textile decoration with vibrant color, detailed imagery, and strong adhesion across a wide range of fabrics. This guide outlines essential steps—from artwork preparation and materials to heat-press settings and aftercare—that help you achieve durable, professional results. By prioritizing precise alignment, consistent temperatures and timings, and careful post-care, designers and DIYers can reduce waste, save time, and improve repeatability. As you gain experience, regularly calibrate your heat press, test on fabrics similar to your production materials, and maintain your consumables to extend the life of every transfer. In short, DTF Transfers empower you to deliver high-quality, durable prints across diverse fabrics and designs.