
Embroidered design techniques form the backbone of any successful project, whether you are embellishing a delicate handkerchief or stitching a bold wall hanging, and they influence texture, density, and overall finish. A practical embroidery stitches list guides you from simple running stitches to more complex lines, so you can see how each option shapes texture and presence on fabric, from light sheens to dense coverage. Understanding backstitch vs satin stitch helps you plan crisp outlines versus smooth fills, while this framework also covers how to choose embroidery thread for different fabrics and finishes, including fiber content, sheen, and durability. You will find essential techniques such as satin stitch techniques explained with tips that make fillings even and bold, complemented by practical hand embroidery tips for beginners, intermediates, and seasoned stitchers seeking consistency. Whether you are new to embroidery or seeking to elevate your craft, this guide invites you to practice with intention, experiment with texture, and turn fabric into art through patient repetition.
Viewed through an alternative lens, needlework methods, stitchwork, and textile embellishment all aim to give shape, texture, and story to fabric. Whether you call it embroidery, threadwork, or decorative stitching, each term links to similar techniques and rich traditions. This broader framing highlights tools, materials, and planning steps that translate ideas into visible texture. From choosing appropriate fabrics to selecting threads and securing tension, the same goals drive both hand and machine interpretations. By embracing related terms, you align your content with search intent and help readers discover practical tips across related topics.
Embroidered Design Techniques: From Foundations to Mastery
Embroidered design techniques form the backbone of any successful embroidery project, guiding how texture, shade, and story come together on fabric. Framing your work with clear technique choices helps you predict how threads will lie, how light will catch them, and how durable the final piece will feel to the eye and touch. In this sense, Embroidered design techniques are not just about aesthetics but about the mechanics of line, fill, and form that translate a concept into thread and fabric.
A solid start means knowing the fundamentals and expanding thoughtfully from there. Begin with a simple progression of stitches—running, backstitch, and satin stitch—and observe how each choice affects density and readability. For reference, an embroidery stitches list can be a helpful map to see how different stitches behave on your fabric and how they build toward more complex motifs. As you practice, you’ll build confidence in translating sketches into stitched shapes and lines.
Choosing Fabric, Threads, and Tools for Effective Embroidery
The first step in achieving professional results is selecting compatible materials. The fabric’s weave, weight, and surface texture determine how stitches sit and how much you can simplify or layer color. A plain weave like cotton or linen is forgiving for beginners, while evenweave or tightly woven fabrics offer a crisper surface for detail—important for both hand embroidery tips and precise line work.
Thread choice dramatically influences sheen, density, and durability. Cotton embroidery floss, polyester, and silk each bring a distinct character to your piece, so match thread weight to fabric and stitch type. When you’re unsure where to start, consult an embroidery stitches list to compare how different threads behave with backstitch or satin stitch. Don’t forget essential tools—needles, hoops, and sharp scissors—that keep your work neat and controllable.
Backstitch vs Satin Stitch: Outlining vs Filling for Impact
Backstitch and satin stitch are the foundational duo for defining shapes and filling spaces. Backstitch provides crisp, continuous lines that read well for outlines, text, and delicate details, while satin stitch creates smooth blocks of color that can glow with even density. Understanding the strengths and limits of each stitch helps you plan a design where lines stay sharp and color fills feel lush.
When to use which stitch often comes down to balance and practicality. For fine edges and precise contours, backstitch is the go-to option, while larger solid areas benefit from satin stitch’s tidy coverage. As you experiment, you’ll learn to blend both stitches in a single piece—outlines sharpen with backstitch and fills soften into satin-stitch blocks. If you’re exploring techniques, a quick look at backstitch vs satin stitch tips can help you avoid common pitfalls and achieve cleaner transitions.
Satin Stitch Techniques: Achieving Smooth, Even Fills
Satin stitch techniques aim for a luxurious, satiny surface where stitches lie flat and close together. Achieving even coverage requires careful preparation: taut fabric to prevent puckering, short-to-medium length stitches that stay aligned, and consistent tension across the row. Following these guidelines helps you build bold color blocks that read clearly and stay durable over time.
Practical satin stitch practice also involves direction and edge management. Align stitches with the contour of the design so fills follow natural curves, and avoid gaps that reveal the fabric beneath. Pair satin fills with subtle backstitch outlines to emphasize edges and add crispness. If you’re studying techniques, a reference to satin stitch techniques can guide you toward even, professional results in both hand and machine contexts.
Expanding the Stitch Palette: A Guide to the Embroidery Stitches List
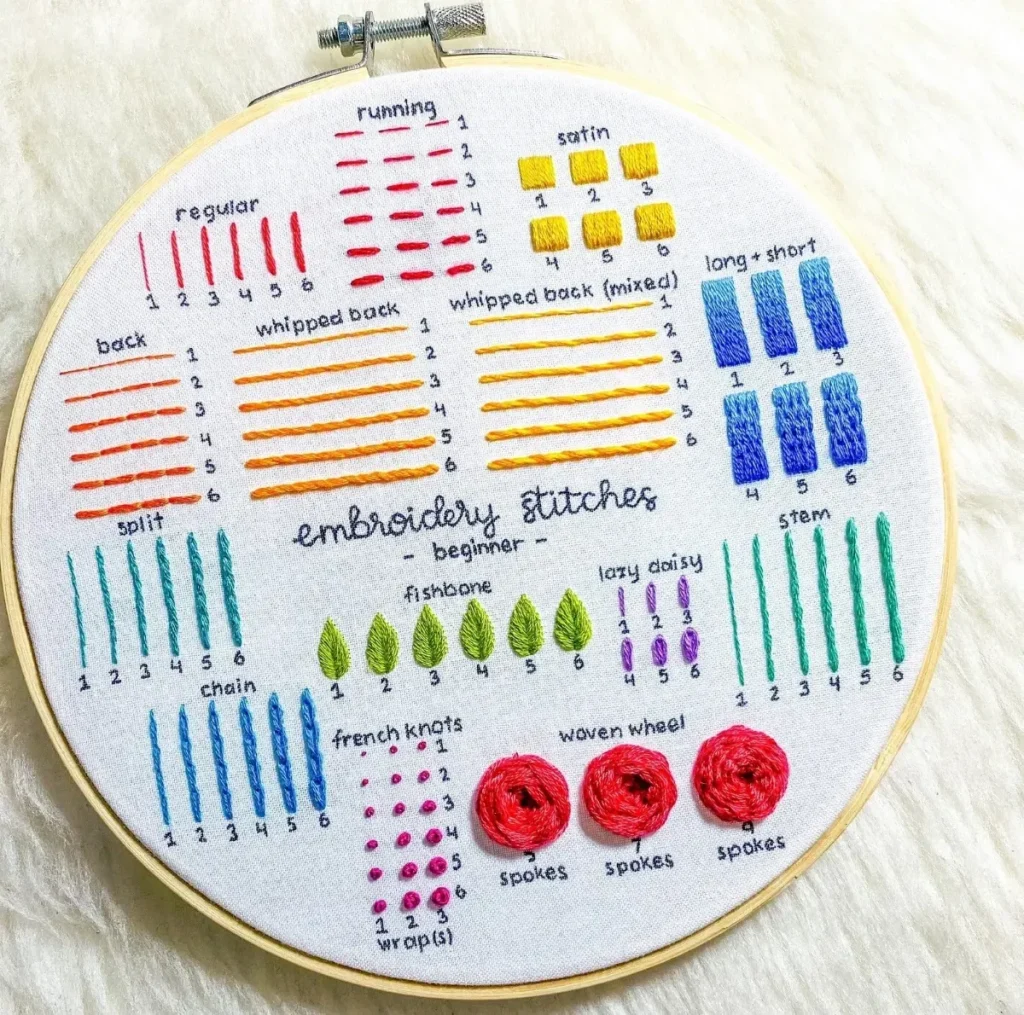
Beyond the core stitches, a rich embroidery journey involves an ever-growing palette of options. The embroidery stitches list covers stems, chains, running stitches, French knots, and couching, each contributing texture and rhythm to a design. Exploring this wider toolkit lets you craft everything from fine, airy motifs to dense, painterly fills, expanding what’s possible with thread and fabric.
As you broaden your repertoire, think in terms of texture, density, and light interaction. Combine stem stitches for vines, chain stitches for decorative lines, and French knots for subtle punctuations within a satin-filled shape. Keeping a stocked embroidery stitches list handy helps you remember best uses and practical applications, while ongoing practice develops your ability to choose the right stitch for each design moment.
From Sketch to Stitch: Planning, Practice, and Hand Embroidery Tips
A successful project starts with a thoughtful plan. Choose a motif and determine the focal point, decide on a cohesive color palette, and outline which stitches will best achieve the intended effect. Planning connects the idea on paper with the texture you’ll produce in thread, so you can translate concept into stitches with confidence.
Practice remains essential in hand embroidery. A dedicated practice piece lets you refine tension, stitch length, and fabric support before committing to your final work. Useful hand embroidery tips include testing on scrap fabric, marking guidelines transparently, and reviewing the embroidery stitches list to map your progression. With consistent practice, you’ll enjoy more decisive planning, cleaner outcomes, and a smoother finish from sketch to stitch.
Frequently Asked Questions
What are embroidered design techniques and how does the embroidery stitches list help you plan projects?
Embroidered design techniques are the craftsman’s language for shaping, shading, and storytelling on fabric. They influence texture, density, and the final look. Using the embroidery stitches list helps you map stitches like backstitch and satin stitch so you can plan texture and coverage before starting.
How do I choose embroidery thread for different fabrics and stitches, and what factors influence how to choose embroidery thread?
Thread choice depends on fiber (cotton floss, polyester, silk), fabric weave, desired sheen, and project density. For satin stitch or detailed fills, test tension and use the right number of strands for even coverage. This is a practical guide on how to choose embroidery thread.
Backstitch vs Satin Stitch: when to use each?
Backstitch yields crisp outlines and fine details; satin stitch creates smooth, solid color fills. Many designs benefit from combining both stitches—outlines with backstitch and fills with satin stitch.
What are satin stitch techniques for smooth fills?
Satin stitch techniques require a taut fabric, short to medium length stitches, and stitches aligned with the design contour. Keep stitches adjacent with minimal gaps to achieve an even, satiny surface.
What hand embroidery tips help improve texture and control?
Hand embroidery tips include using a hoop, keeping consistent tension, planning with a simple embroidery stitches list, practicing on scrap fabric, marking guidelines, and rotating the fabric to work comfortably.
How can I use the embroidery stitches list to plan from sketch to thread?
An embroidery stitches list guides planning: choose a motif, assign backstitch for outlines and satin stitch for fills, add stem stitch for curves and French knots for texture, then create a color-matched thread guide and test on scraps.
| Aspect | Key Points | Notes |
|---|---|---|
| Overview | Foundational role; guides from simple to complex stitches; emphasizes texture, density, and overall look. | Sets expectations for planning and practice. |
| Core Concepts | Control, consistency, and intention shape final look; stitch choice impacts texture. | Fabric and thread choice matter. |
| Tools & Setup | Fabric, hoop/frame, needles, threads, marker, scissors. | Choose appropriate fabric; test tension. |
| Foundational Stitches | Backstitch and satin stitch are core; outlines vs fills. | Learn their behavior on your fabric. |
| Backstitch | Foundation for definition; continuous lines; anchor. | Keep stitches uniform; practice on scrap. |
| Satin Stitch | Solid fills; smooth surface; requires taut fabric. | Place adjacent stitches; avoid gaps; follow contours. |
| Combined Use | Backstitch for outlines, satin for fills; test on scrap. | Feather transitions between styles. |
| Other Stitches | Stem, Chain, Running, French Knot, Couching add texture. | Use to achieve range of textures. |
| Design Planning | Motif, color palette, stitch plan, thread guide, practice. | Plan on scrap fabric; mock lines and fills. |
| Practical Tips | Tension, thread management, fabric prep, marking guidelines. | Practice piece helps refine technique. |
| Finishing & Care | Back with knot; framing or mounting; gentle washing. | Check thread care and fabric integrity. |
| Conclusion | Progress in Embroidered design techniques leads to confident, expressive stitching. | Focus on planning, control, and careful finishing. |
Summary
Embroidered design techniques open a world of textile artistry, offering a versatile toolkit for turning plain fabric into expressive art. By starting with foundational stitches like backstitch and satin stitch and progressively layering texture, density, and color, you can control line, shape, and mood in your pieces. This guide highlights essential stitches, practical tips on thread selection and fabric compatibility, and a planning approach that helps you move from sketch to stitched reality. Whether your goal is delicate hand embroidery or bold machine work, embracing thoughtful design decisions, consistent tension, and careful finishing will elevate every project.