
Embroidered patches are a durable, tactile way to personalize clothing, bags, and gear with logos, mascots, or personal flair. They offer a professional finish that stands up to washing and everyday wear, making them ideal for embroidered patches for clothing, teams, and brands. This guide blends creativity with practical steps, showing how to design patches—from concept to production—and turn ideas into printable artwork. You’ll also explore patch design ideas that balance visual impact with stitch count, color limits, and budget. From concept to completion, knowing the patch manufacturing process and related considerations will save time and improve results.
Viewed from a broader lens, these stitched badges are often called sewn-on emblems or fabric patches that decorate apparel while signaling identity. Alternative terms such as stitched insignias, badge embroidery, or textile adornments describe the same concept in different settings. Using LSI-friendly language, you might reference embroidery patches, custom badge design, or patch design ideas in variations to capture related searches. Whether you’re outfitting a team, a club, or a fashion line, the goal remains the same: durable, legible, and visually appealing branding through fabric embellishments. Understanding these synonyms helps your content reach a broader audience while staying true to the core topic of embroidered patches.
Mastering Custom Patch Design: From Concept to Production
Every successful patch begins with a clear concept and purpose. In the realm of custom patch design, defining the target audience, the intended message, and the placement on the garment helps guide shape, size, and stitching decisions from the outset.
Understanding production realities early—budget, minimums, and lead times—keeps your design from becoming theoretical. By aligning your concept with the patch manufacturing process, you can select a shape, decide edge finishes, and prepare color-ready artwork that travels smoothly to production.
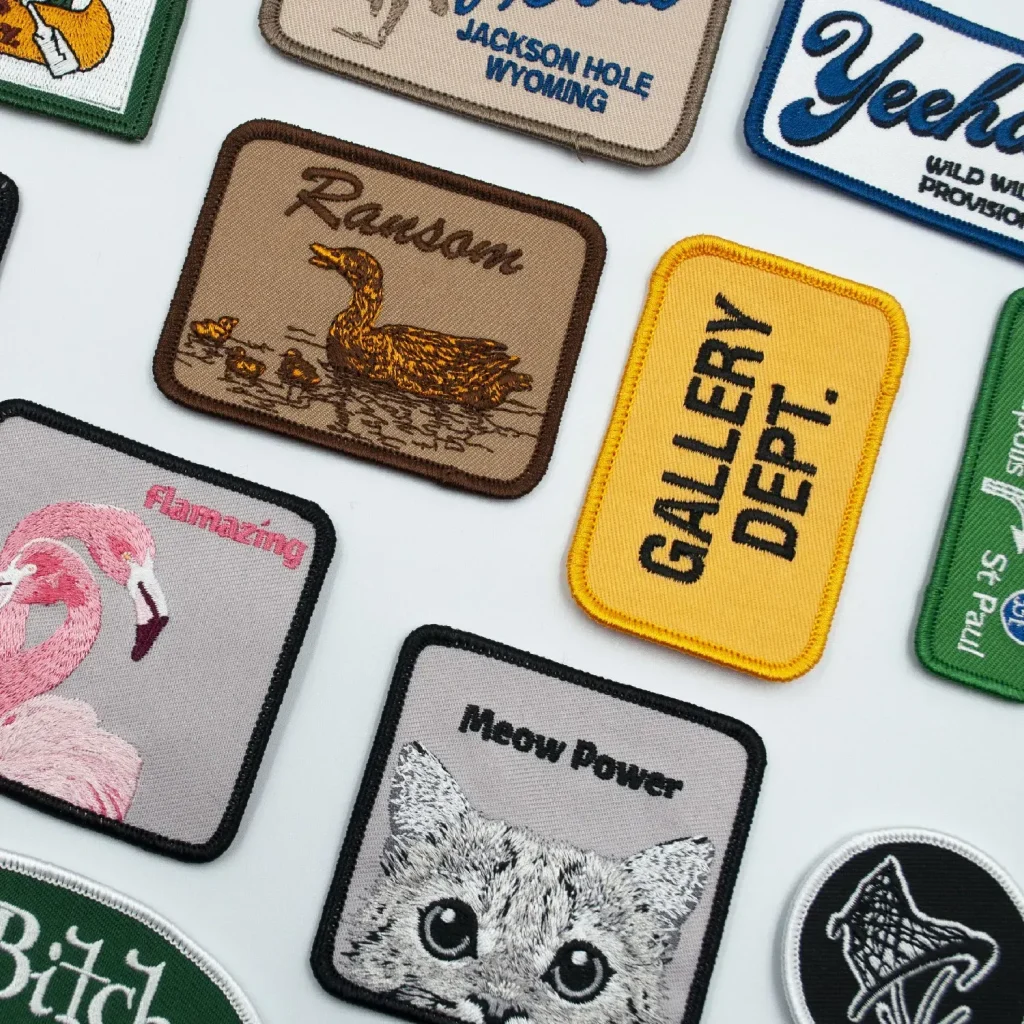
Embroidered Patches for Clothing: Durability, Style, and Brand Identity
Embroidered patches for clothing offer a premium, tactile finish that communicates branding and team identity with durability. The texture and color depth achieved by machine embroidery makes logos and slogans legible on a variety of fabrics, from jackets to hats and bags.
Edge finishes, backings, and attachment methods shape how your patches wear over time. Choosing a merrow border for a clean edge, selecting iron-on versus sew-on backings, and considering Velcro for removable patches all influence the look and practicality of embroidered patches for clothing.
How to Design Patches: A Step-by-Step Guide for Beginners and Pros
How to design patches starts with a simple framework: define the concept, pick a bold silhouette, and plan the scale for legibility. This is a practical guide for how to design patches, guiding you through concept, size, borders, and color decisions so your patch reads clearly from a distance.
Next, move through steps 4–7: choose thread colors, backing type, edge finishes, and prepare production-ready files. Each choice affects cost and durability, and refining your approach is a core part of custom patch design.
Patch Design Ideas: Practical Themes for Every Project
If you’re brainstorming patch ideas, start with clear categories and a few core motifs. Patch design ideas that work well include logo patches for teams, mascots with bold color blocks, and slogan patches designed for high-contrast typography.
Event patches, decorative patches, and badges offer additional avenues for creativity while keeping production realities in view. When you brainstorm patch design ideas, consider silhouette, color palette, and the intended garment color to maximize impact.
Choosing Materials, Backing, and Size for Quality Patches
Quality starts with materials. The choice of fabric for the patch surface—twill, felt, or twill-backed options—affects color fidelity and stitch density. These material choices are inseparable from the patch manufacturing process, as they dictate durability, texture, and feel.
Backings and edge density matter too. Iron-on backings offer convenience but may affect fabric stability, while sew-on backing delivers long-lasting wear. Align stitch density with the patch size and color management goals to keep the design readable and cost-effective. Knowing how to design patches with the right stitch density is part of a scalable plan.
Understanding the Patch Manufacturing Process: From Artwork to Finished Patch
Understanding the patch manufacturing process takes you from concept art and digitizing to production-ready files, proofs, and finally the finished patch. This end-to-end view helps you forecast costs, lead times, and quality checkpoints so your project stays on track.
Quality control, pre-production samples, color matching, and wash tests ensure the patch holds up under real-world use. By collaborating with a skilled digitizer and manufacturer, you can translate your custom patch design into tangible results that communicate your brand with consistency.
Frequently Asked Questions
What are embroidered patches and why choose them for clothing?
Embroidered patches are fabric shapes with stitched designs that are heat-sealed or sewn onto clothing. They offer durability, texture, and color depth, giving a premium, professional look to shirts, jackets, and bags. When you pursue a custom patch design, you benefit from a tactile finish that stands up to washing and wear. This makes embroidered patches a versatile choice for branding, teams, clubs, or personal flair.
How to design patches: what is the custom patch design process?
Start with the concept and purpose, then choose shape and size. Create artwork and digitize it with a designer to guide the stitches and color changes, and decide on backing and attachment options. Select thread colors, finishes, and edge options (merrow or satin) before preparing files for production. Working with a patch maker or digitizer helps ensure your design translates well to embroidery.
What backing and attachment options exist for embroidered patches for clothing, and how do they affect the patch manufacturing process?
Backing options include iron-on, sew-on, Velcro, and no backing. Each option affects application, wash durability, and the overall patch manufacturing process. For example, iron-on backs are convenient but may require care instructions, while sew-on backs are the most durable for frequent washing.
What are some patch design ideas for teams, clubs, or brands?
Good patch design ideas include logo patches for branding, mascot or character patches for personality, slogan patches with high-contrast typography, event patches to commemorate occasions, and decorative patches for fashion-forward looks. Use bold silhouettes and a focused color palette to keep patches readable and scalable across items like uniforms, jackets, hats, and bags.
How do you choose materials and edge finishes for embroidered patches used on clothing?
Choose patch surfaces such as twill or felt, and select an edge finish (merrow border for a classic look or satin stitch for a refined outline). Match thread colors to your brand palette with Pantone references, and pick a backing that suits the garment and wash frequency. These choices impact texture, weight, and visual impact on clothing.
What should I know about costs, turnaround, and quality control in the patch manufacturing process for embroidered patches?
Costs depend on setup fees, minimum order quantities, and patch complexity, so request samples and a pre-production review. Turnaround is typically about 1–3 weeks after artwork approval, with rush options available at higher costs. For quality control, inspect the stitching closely, verify color matching, and test patches on fabric to ensure durability through washing and wear.
| Aspect | |
|---|---|
| What are embroidered patches? | – Fabric shapes with stitched designs created from thread; durable, textured, and rich in color depth. – Heat-sealed or sewn onto garments; popular for uniforms, clubs, sports teams, brands, and DIY fashion; offer a premium tactile element. |
| Edge finishes and backing options? | – Edge: Merrow border for a clean, professional edge that resists fraying. – Backings: iron-on/heat-seal, sew-on, Velcro, or no backing for custom sewing. |
| The design process (concept to production) | – Define concept and purpose; determine size and placement. – Choose shape and size; ensure legibility. – Create artwork and digitize with a stitch file. – Select thread colors/materials; consider backing. – Decide backing type and attachment method. – Finishing touches: edge options like merrow or satin; optional heat-cut edges. – Prepare production files for the manufacturer. |
| Shapes, sizes, and color management | – Common shapes: circles, ovals, shields, custom contours. – Size affects legibility and cost; high-contrast designs read better at a distance. – Use Pantone-like color matching; limit color count for cost/manageability. |
| Materials and stitch considerations | – Patch surfaces: twill, felt, denim textures; each affects color fidelity and stitch density. – Backing choices: iron-on, sew-on, Velcro. – Stitch density: 12-14 stitches/mm is a baseline; denser for small text; balance color management with brand palette. |
| Production realities: costs, turnaround, QC | – Setup fees, MOQs, and per-patch pricing vary with complexity. – Order samples to verify color, edge, and backing performance. – Turnaround: typically 1-3 weeks after artwork approval; rush options may cost more. – QC: pre-production sample, inspect stitching, verify color matching, and test washability. |
| Design best practices and pitfalls | – Start simple with bold shapes and high contrast. – Keep text minimal; test readability from a distance. – Use a border that complements the design (merrow or satin). – Provide vector artwork and a digitized file; share color charts. – Avoid too many colors for small patches and ensure clean edge finishes. |
| From concept to production: quick checklist | – Define purpose and audience. – Decide shape, size, and edge finish. – Prepare artwork and coordinate with a digitizer. – Select materials, backing, and attachment method. – Create and approve a test patch before full production. |