
Embroidered stitch techniques open a world where fabric becomes a canvas of color, texture, and personality. Whether you’re just starting or expanding your repertoire, these beginner embroidery stitches—satin stitch, backstitch technique, and French knot tutorial—can elevate any project. This embroidery stitches guide shows core stitches and practical tips to help you achieve clean lines, smooth fills, and tactile texture. By exploring contrasts of density and line, you’ll see how a few well-chosen stitches create a polished piece with a personal touch. With practice and patience, your sessions will build confidence and enjoyment in every stitch you sew.
From a broader craft perspective, these hand-stitched techniques can be described as needlework methods that build texture, color, and structure on fabric. You’ll hear terms such as surface embroidery, decorative stitches, and threadwork, which all point to the same core ideas of planning, layering, and controlling tension. For learners, imagine a toolkit of stitch forms—satin fills, crisp outlines, and purl-like textures—that work across many projects. Framing practice in everyday craft language helps beginners and seasoned stitchers connect with the ideas behind each stitch without feeling overwhelmed. As you explore related concepts, you’ll discover why different names still describe the same expressive techniques.
Embroidered stitch techniques: Foundations for Color, Texture, and Skill Progression
Embroidered stitch techniques form the heart of hand embroidery, turning simple fabric into a canvas of color, texture, and personality. In this foundation, you’ll discover how satin stitch, backstitch technique, and French knots work together to build confidence from the first stitch to more intricate blends. View this as a guided path through an embroidery stitches guide that emphasizes clean lines, even fills, and tactile details, so your pieces feel deliberate rather than hurried.
Whether you’re a true beginner or looking to expand your repertoire, this overview frames stitching as a vocabulary you can grow with. You’ll learn not just the how, but the why behind each choice—why satin stitch creates lush fills, why backstitch defines edges with precision, and why French knots punctuate designs with tiny, punchy texture. As you read, picture your first projects coming to life with calm, controlled movement and a growing sense of stitched personality.
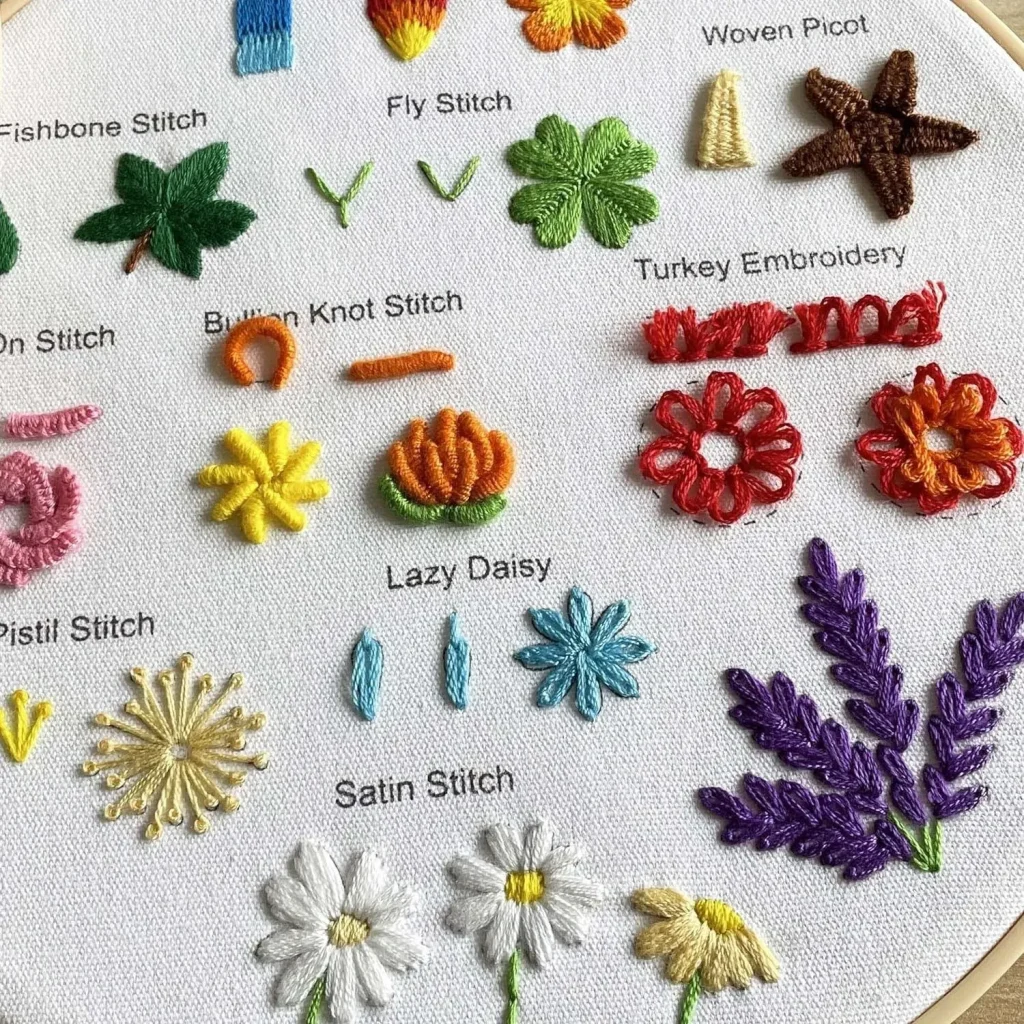
Satin Stitch: Master the Smooth Fills for Lush Color Blocks
Satin stitch stands as the foundation for smooth fills, offering a glossy, seamless surface that makes colors pop. It’s ideal for petals, leaves, letters, and any area where you want solid color without gaps. By practicing even, parallel stitches, you’ll cultivate a refined, professional look that elevates your embroidery to a polished level.
The approach to satin stitch emphasizes rhythm and tension—plan the shape, lay down long, uniform stitches, and keep the fabric from puckering. With mindful spacing and a light hand, you can build layer upon layer for richer depth. This section also invites you to explore density with one or two threads for a controlled finish, always returning to the idea of a consistent direction for a pristine effect.
Backstitch Technique: Clean Outlines and Continuous Lines for Precision
Backstitch technique is celebrated for its ability to create crisp outlines and durable, continuous lines. It’s particularly effective for lettering, edge definition, and any design where precision matters. By breaking the path into controlled, even stitches, you’ll craft lines that read clearly from a distance and sit confidently on the fabric.
To achieve neat backstitch lines, maintain uniform stitch length and choose thread weight that matches your design’s scale. For curves and bold shapes, slight adjustments in stitch angles help the line breathe with the fabric, avoiding a stiff, mechanical look. With consistent practice, your outlines will become a reliable backbone for your embroidery projects.
French Knots: Tiny Texture and Dimension You Can Create
French knots inject subtle, tactile texture into any embroidery. They’re perfect for centers of flowers, decorative dots, or tiny focal points that catch the eye without overpowering surrounding stitches. When done with care, these small knots can transform a simple motif into something lively and dimensional.
Learn the rhythm of forming French knots as you would a small craft ritual: bring the needle up, wrap the thread around the needle a few times, insert near the entry point, and pull through with steady tension. Common issues like knots sitting too high or looking uneven become easier to resolve with a little patience and consistent wraps, turning tiny stitches into reliable texture accents.
Embroidery Stitches Guide: From Beginner Embroidery Stitches to Expert Textures
This section positions your practice along a continuum—from beginner embroidery stitches to richer, more expressive textures. It integrates satin stitch, backstitch technique, and French knot tutorial concepts into a cohesive learning arc, guiding you through material choices, thread types, and needle sizing that suit different projects.
As you progress, you’ll find the balance between structure and spontaneity. An embroidery stitches guide is a helpful companion, reminding you how each stitch contributes to the whole—how bold outlines can support delicate fills, and how tiny knots can punctuate a design with personality. The goal is steady improvement, not rapid perfection, so you can sew with confidence and joy.
Practical Practice Project: Blending Satin Stitch, Backstitch, and French Knots in a Small Panel
A practical practice project helps translate theory into textured reality. Sketch a simple floral motif with a few petals, a stem, and a couple of leaves, then apply the core stitches you’ve learned: backstitch for outlining, satin stitch for the petals, and French knots for centers or decorative accents. This cohesive exercise mirrors the progression from beginner embroidery stitches to more expressive textures.
Step-by-step, you’ll secure the fabric in a hoop, outline with backstitch, fill with satin stitch, and dot the design with a few carefully placed French knots. Finish by tidying the back and pressing gently to set the stitches. Completing this small panel will reinforce tension control, stitch alignment, and the feel of stitching as a satisfying, creative craft.
Frequently Asked Questions
How do embroidered stitch techniques shape a project, and where do satin stitch and backstitch technique fit in?
Embroidered stitch techniques turn fabric into an art form by adding color, texture, and personality. Satin stitch provides smooth, even fills, while the backstitch technique creates clean outlines and long, continuous lines. By planning your design and balancing fills with outlines, you can achieve polished edges and lush color in any project.
What is satin stitch and how can I use it for smooth fills in embroidered stitch techniques?
Satin stitch is a versatile fill stitch that lays parallel lines flat for solid color. To use it: plan the shape, bring the needle up at the edge, work long, even stitches in the same direction, keep tension steady, and fill any gaps for a uniform texture. For best results, practice density with one thread or two and keep stitches aligned.
What is the backstitch technique and when should I use it for outlines?
The backstitch technique is ideal for outlining shapes and creating crisp, continuous lines. Start at the edge, make a short back stitch, then bring the needle up ahead of the previous stitch and continue. Keep stitches uniform in length and finish with a secure knot or woven tail for a neat edge.
Where can I find a French knot tutorial within embroidered stitch techniques and how do I place knots for texture?
French knots add texture and dimension. For a French knot: bring the needle up where you want the knot, wrap the thread 1–3 times around the needle, insert the needle near the entry point, and pull through slowly while maintaining the wrap. Place knots for centers or accents, and troubleshoot common issues like knots sitting high or being uneven.
Which beginner embroidery stitches should I start with to build confidence in embroidered stitch techniques?
Start with the basics: learn the backstitch technique for outlines, then practice satin stitch for smooth fills, and add a few French knots for texture. Practice on a hoop with scrap fabric, choose appropriate thread and needle sizes, and gradually work up to simple designs.
How can I plan and combine satin stitch, backstitch, and French knots for a cohesive project using the embroidery stitches guide?
Plan a design by outlining with backstitch, filling shapes with satin stitch for a polished surface, and placing French knots as texture punctuation. Use a consistent thread, maintain tension, and consider layering lighter threads over darker ones. Refer to an embroidery stitches guide to balance density, texture, and color for a cohesive piece.
| Topic | Overview | How to Use | Tips |
|---|---|---|---|
| Satin Stitch | Foundation of smooth fills; creates a lush surface for petals, leaves, letters, and other shapes with a glossy finish. | Plan shape, outline the area, then lay long, parallel stitches with even length and consistent tension; keep direction aligned for a polished fill; refine any gaps at the end. | Use 1–2 threads; keep stitches parallel and in the same direction; practice on scrap to perfect length and tension. |
| Backstitch | Clean outlines and lines; ideal for outlining shapes, lettering, and crisp edges; produces a durable, even line. | Start at the edge, create small back stitches, move forward with evenly spaced stitches, and finish with a knot or secure ends. | Keep stitch length consistent; use thicker thread for bolder outlines; adjust angles for curves to maintain smooth curves. |
| French Knots | Tiny knots with big texture; great for centers of flowers and decorative texture accents. | Bring needle up at the desired point, wrap thread 1–3 times around the needle, insert near the entry point, and pull through slowly while maintaining the wraps. | Keep wraps consistent; don’t pull too tight to avoid sinking; adjust knot size by number of wraps; practice for uniform knots. |
| Combining Stitches | A versatile approach: outlines with backstitch, fills with satin stitch, and texture with French knots. | Outline first, fill interiors with satin stitch, then add knots as punctuation or texture accents; layer for depth. | Plan your path, balance texture and density, and choose thread weights to suit the effect; keep edges neat. |
Summary
Embroidered stitch techniques describe a flexible toolkit for transforming textiles into art. By mastering satin stitch for smooth fills, backstitch for precise outlines, and French knots for texture, you gain a versatile approach to countless projects—from simple decorative motifs to more complex hand-embroidered panels. Practicing these stitches strengthens your control of fabric, thread, and tension, while mindful choices about fabric, needle size, and thread type help you achieve neat, durable results. With patience and experimentation, you’ll be able to combine stitches to create expressive pieces that reflect your personal style, all while enjoying the tactile satisfaction of hand embroidery.