
Screen Printing for Beginners opens a practical door to a versatile craft that yields crisp designs on fabric, paper, and more. If you’ve ever admired a bold tee or a personalized tote, you’ve witnessed the power of screen printing in action. This beginner guide focuses on helping you start with confidence, covering the essentials of the setup and simple at-home projects you can complete without a professional studio. By the end, you’ll understand the core printing techniques and how to set up a safe at-home workspace. With a little practice, you’ll start turning ideas into durable prints you’re proud to wear or display.
Beyond the basics, treat this as a fabric printing entry point—a practical guide that embraces silkscreen basics while you explore simple, hands-on projects. To start safely and efficiently, you’ll learn about screen printing supplies, ink options, and the essential workflow that keeps beginners organized and curious. If you’re curious about how to screen print at home, this practical overview covers setup, basic tools, and starter projects that fit a kitchen table or a small studio. As you progress, you’ll gain confidence with technique, registration, and color layering, and you’ll see how multi-color designs come together while keeping safety and cleanup in mind.
Screen Printing for Beginners: A Practical Starter Guide
Screen Printing for Beginners opens a practical entry into a craft that can yield crisp designs on fabric, paper, and more. This guide helps you start with confidence by focusing on essential screen printing supplies, the silkscreen basics, and a few simple at-home projects you can tackle this weekend.
From the first kit to your initial prints, you’ll learn a gradual path: choose a single substrate like a cotton tee, assemble a basic starter set, and practice the core steps until your results feel reliable. Along the way, you’ll become familiar with terms such as emulsion, squeegee, and exposure, and you’ll see how each choice shapes texture, opacity, and edge definition.
Getting the Right Tools: Screen Printing Supplies You Need to Start
Starting your project means gathering the right tools. Key items include frames and screens with a suitable mesh count (110–156 is a versatile range for beginners working on textiles and posters), plus inks, emulsions, squeegees, and a safe washout area. Keeping these screen printing supplies in mind helps you build a solid foundation without overwhelm.
Inks offer a spectrum of finishes—from water-based inks with a soft hand feel to plastisol inks for brighter color and durability. As you grow, you’ll also explore emulsions, emulsion removers, transfer materials, and cleaning supplies. Remember, you don’t need every item at once; start with a focused starter kit and expand as your projects evolve.
The Silkscreen Basics Explained: How Printing Works
Silkscreen basics center on a stencil that blocks ink in certain areas while allowing it through in others. The stencil is created by coating a screen with emulsion and then exposing it to light with your design laid over it. After exposure, the unexposed emulsion is washed away, leaving a reusable screen ready for printing.
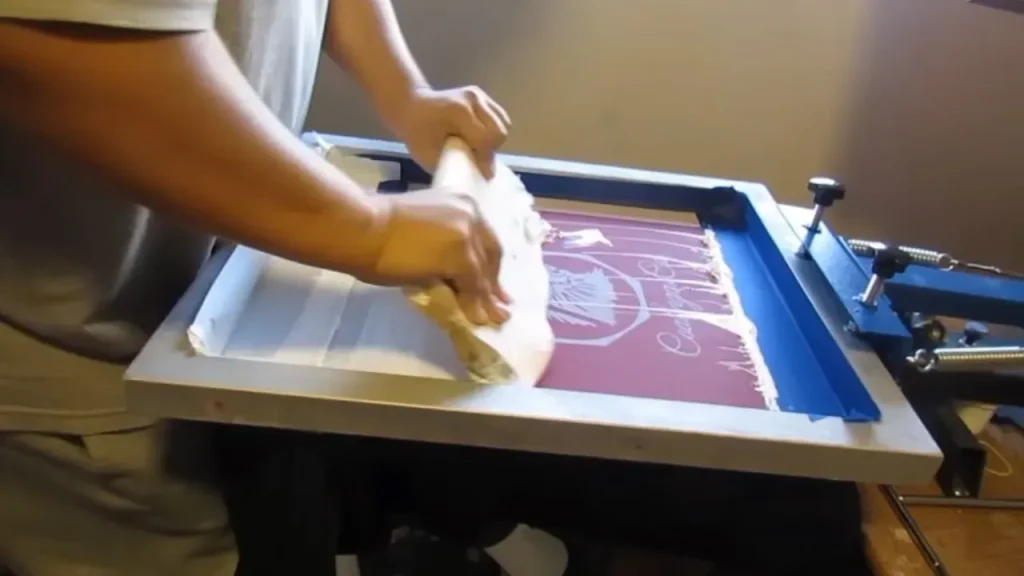
For beginners, the essential steps are straightforward: prepare the screen and workspace, coat the screen evenly with emulsion using a scoop coater, expose the stencil, then wash out the unexposed areas and let the screen dry. With practice, you’ll develop a feel for even squeegee pressure, consistent ink viscosity, and clean edge definition—the core elements of solid screen printing techniques.
From Setup to First Print: How to Screen Print at Home
A beginner-friendly workflow starts with a simple design and a clean substrate. Set up a flat, protected workspace, secure the screen, and apply a thin, even coat of emulsion. Let it dry in a dark, dust-free area before you move to exposure.
Expose the stencil, rinse the screen to reveal it, and allow the screen to dry completely. Then prepare your ink and substrate, position the print area, and execute the first print with steady, even pressure. After printing, cure the ink according to the manufacturer’s instructions. This practical path is a core part of how to screen print at home and builds confidence with each try.
Easy DIY Screen Printing Projects to Build Confidence
Once you’ve grasped the basics, dive into beginner-friendly DIY screen printing projects. Try custom cotton tote bags, greeting cards, posters, or notebook covers. These projects are ideal for practicing alignment, ink flow, and color control while producing tangible, usable items.
For each project, aim for 1–2 clean color separations and a consistent print stroke. If you notice ghosting or faint edges, review your emulsion dryness, squeegee angle, and ink viscosity. These simple projects, labeled as DIY screen printing projects, help you build confidence for more complex designs over time.
Troubleshooting and Refining Your Technique: Screen Printing Techniques for Better Results
Newcomers often run into ghosting, inconsistent ink flow, or blurred edges. These issues usually point to underexposed screens, stencil adhesion problems, or movement of the substrate during printing. Identifying the root cause is the first step toward reliable results.
Practical fixes include adjusting exposure times, recoating with fresh emulsion, and refining ink viscosity and squeegee pressure. Practicing with registration marks and careful multi-color alignment can dramatically improve results. These tips and experiments reflect the ongoing nature of screen printing techniques, helping you iterate toward crisp, professional-looking prints.
Frequently Asked Questions
What is Screen Printing for Beginners and what screen printing supplies do I need to get started at home?
Screen Printing for Beginners is a practical entry into a versatile craft for crisp designs on fabric, paper, and more. To start at home, gather a basic screen printing supplies kit: frames and screens with a suitable mesh (110–156 is versatile for textiles), beginner-friendly inks (water-based options for soft hand feel or plastisol for durability), emulsion and emulsion remover, a squeegee, an exposure unit or safe light setup, a drying rack, transfer materials, and cleaning supplies. Start with one substrate (like a cotton tee) and expand your toolkit as you gain experience.
What are silkscreen basics and how do they translate into effective screen printing techniques?
Silkscreen basics involve creating a stencil on a screen using emulsion, exposing it to light with your design, and washing away the unexposed emulsion to reveal a reusable stencil. In screen printing techniques, you’ll learn to prepare the screen, coat with emulsion, expose, wash out, dry, and then print with even squeegee pressure and consistent ink viscosity for sharp edges and solid color.
What are easy DIY screen printing projects I can start as a beginner?
DIY screen printing projects for beginners include custom cotton tote bags, greeting cards or posters, graphic tees with a single color, and notebook covers. Focus on 1–2 color separations and simple, bold designs to build confidence, practice alignment, and improve ink flow before moving to multi-color prints.
How can I learn how to screen print at home safely with a beginner-friendly setup?
To screen print at home safely, set up a well-ventilated area with a dedicated workspace and a washout station. Use proper lighting for exposing screens, wear protective gear as needed, and store emulsions and chemicals cool and dark. For beginners, start with a simple contact exposure method and basic drying area, then advance to more controlled setups as you gain experience.
What are common issues in Screen Printing for Beginners and how can I fix them using basic screen printing techniques?
Common issues include ghosting or faint edges, inconsistent ink flow, blurry prints, and misalignment. Fixes: recheck exposure time and stencil sharpness to prevent ghosting; stir ink thoroughly and adjust viscosity; ensure the substrate is held steady and the screen is properly tensioned; use registration marks and accurate color separations for multi-color prints.
What should I do to expand my studio after Screen Printing for Beginners—what upgrades should I consider?
To grow beyond Screen Printing for Beginners, consider upgrades like experimenting with different mesh counts for detail, choosing water-based inks for a soft hand feel or plastisol inks for durability, adding a washout or reclaim station, and learning basic color separations or halftone techniques for multi-color designs. As you scale, investing in better exposure lighting, a more robust drying/curing setup, and improved workspace organization will support more ambitious DIY screen printing projects.
| Topic | Key Points | Notes |
|---|---|---|
| Introduction | Screen Printing for Beginners is a practical entry point into a versatile craft that can yield crisp designs on fabric, paper, and more. It focuses on helping you start with confidence, covering essential supplies, the silkscreen basics, and simple at-home projects. By the end, you’ll understand the core techniques, how to set up a safe at-home workspace, and a handful of DIY screen printing projects you can tackle this weekend. | Goal: build confidence and lay a foundation for DIY screen printing. |
| Tools, Materials, and Supplies | Frames and screens: mesh count 110–156 is versatile for textiles and posters. Inks: water-based for softer hand; plastisol for vibrant, durable prints; emulsions and emulsion remover; squeegees; exposure unit or safe light; drying rack and heat source; transfer materials (transparent sheets, tape, spatulas, scoop coater); cleaning supplies. Starter-kit approach: begin with one substrate and expand later. | Start simple; build gradually; ensure a safe, ventilated workspace. |
| Silkscreen Basics | Stencil is created by coating a screen with emulsion, exposing it to light with your design, then washing out the unexposed emulsion to reveal a reusable stencil. | Foundation of printing; practice leads to clean edges and consistent results. |
| Beginner Print Workflow | Design & prep (simple bold design); coat and dry the screen; expose the stencil; wash out and cure; prepare ink and substrate; print; cure and finish. | Emphasizes repeatable steps and safe setup for first projects. |
| Easy Project Ideas | Tote bags; greeting cards/posters; graphic tees; notebook covers. Aim for 1–2 clean color separations and a consistent print stroke; watch for ghosting and adjust emulsion dryness, squeegee angle, and ink viscosity. | Great first practice projects to build confidence and technique. |
| Troubleshooting | Ghosting/faint edges; inconsistent ink flow; blurry prints; stencil clogging/pinholes; color misalignment. | Apply fixes like adjusting exposure, stencil cleanliness, ink viscosity, and registration; practice improves reliability. |
| Expanding Your Studio | Explore different mesh counts for detail and texture; compare water-based vs plastisol inks; add washout/reclaim tools; learn basic color separations or halftone techniques. | Plan gradual upgrades to broaden capabilities. |
| Safety, Care, and Best Practices | Ensure proper ventilation; wear gloves and protective eyewear as needed; clean screens promptly; dispose of waste inks and solvents per local guidelines; store emulsions in a cool, dark place. | Follow safety guidelines and manufacturer recommendations to maintain equipment and results. |
Summary
Screen Printing for Beginners invites you into a practical, hands-on journey where creativity meets craft. This guide emphasizes starting with a focused starter-kit approach, learning the silkscreen basics, and completing simple at-home projects that build confidence. You’ll discover essential tools, a safe workspace setup, and repeatable steps that help you produce crisp prints on fabrics and papers. As you practice, you’ll expand your toolkit and techniques, from basic color separations to proper cleanup and care, turning a hobby into a reliable DIY studio routine.