
UV DTF transfer is changing how crafters and creators approach DIY apparel, combining digital design precision with the tangible feel of heat-applied finishes. It blends the precision of digital design with the durability of heat transfer for clothing, delivering sharp details and a soft hand on fabrics. For those diving into DIY apparel printing, Direct-to-film transfers offer a faster, at-home workflow with vibrant color options and simplified setup. UV printing on fabric expands your palette across cottons, blends, and some synthetics, while maintaining durability that rivals traditional methods. In this UV DTF transfer guide, you’ll learn how to design, print, and apply images with confidence, setting up a reliable home studio workflow.
Alternative terminology for this method includes ultraviolet-cured film transfers, digital-to-film printing, and UV-ink transfers that ride on a carrier film before being pressed onto fabric. The process centers on printing onto a special film with UV-curable inks, curing under ultraviolet light, and then applying the image to textiles with a heat press. Because this approach blends digital workflows with conventional heat-transfer equipment, hobbyists can experiment at home or in a small studio with cost-efficient materials. Key considerations include film selection, ink compatibility, cure settings, and fabric compatibility to ensure long-lasting results even on darker fabrics. Related topics and terms you might encounter include DIY apparel printing techniques, direct-to-film workflows, and fabric printing with UV inks.
UV DTF Transfer Essentials for DIY Apparel: A Modern Alternative to Screen Printing
UV DTF transfer blends digital precision with the durability of heat-set transfers, offering a practical option for DIY apparel printing. By using UV-curable inks on a direct-to-film substrate, you get sharp edges, vibrant colors, and a soft hand feel on cotton, blends, and some synthetics. This approach is a modern alternative to traditional screen printing, and it supports at-home production with a compact workflow.
In the context of the UV DTF transfer tutorial, you’ll learn to design, print, and apply images onto fabrics with a combination of digital design tools and heat-press steps. It bridges the gap between Direct-to-film transfers and at-home projects, enabling you to produce professional-looking garments without investing in a full screen-printing setup. For DIY apparel printing, this method offers speed, consistency, and scalability.
Materials and Tools for UV DTF Transfers
To build a reliable UV DTF workflow, gather UV DTF film and compatible transfer sheets, UV-curable inks, a UV-capable printer or DTF printer with a UV curing module, a curing lamp or UV oven, and a heat press. Weeding tools, scissors, and a lint roller help prep the garment surface; masking tape and a silicone mat support clean setup. This kit supports Direct-to-film transfers and DIY apparel printing from home or a small studio.
Optional items like finishing sprays for UV-cured inks and test garments in fabrics similar to your final product can reduce surprises. The right materials impact wash durability and color vibrancy, so choose inks that match your fabric type and heat transfer preferences for clothing.
Design and File Preparation for Vivid Direct-to-Film Transfers
A strong design foundation is critical for UV DTF transfers. Start in RGB with 300 DPI or higher, ensuring crisp edges once printed on the UV film. Consider mirroring the image if your transfer method requires it, and leave a print-safe margin to accommodate feeding, trimming, and misalignment on darker fabrics.
When targeting Direct-to-film transfers, pick color profiles aligned to your printer’s color management and plan for white underbase or high-contrast elements on dark fabrics. These prep steps reduce misregistration and help you achieve vibrant results when doing UV printing on fabric.
Printing and Curing: From Ink to Ready-to-Press Film
Printing begins with printer calibration and selecting the best quality mode for maximum detail. Use UV-curable inks and align media settings to your film for sharp color and smooth gradients. Allow adequate drying time on the film before handling to prevent smudges.
Curing the printed film is a critical step that differentiates UV DTF from traditional transfers. Use a dedicated UV curing unit and follow recommended exposure times; test cure on scrap film to dial in the right duration. A thorough cure helps lock color fastness and reduces cracking or peeling after transfer.
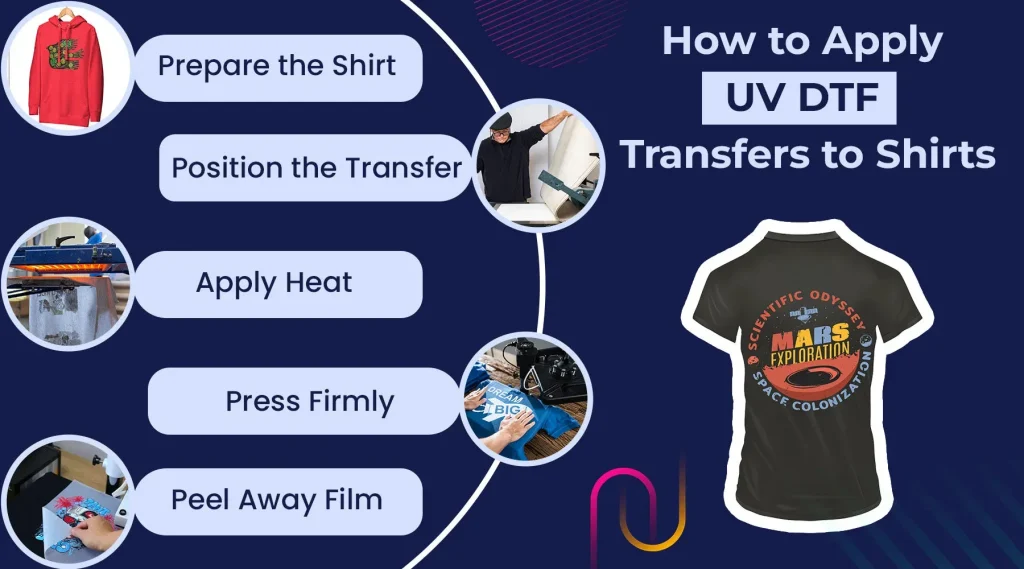
Transferring to Fabric: Alignment, Heat, and Time for Best Results
Transferring requires careful pre-press to remove moisture and create a smooth surface. Align the transfer precisely, using a ruler or T-square, and apply heat and pressure at typical ranges around 300–305°F (149–152°C) for 15–20 seconds with medium to firm pressure. Use a protective sheet to avoid scorching.
Let the garment cool gradually after transfer to maximize adhesion. Follow with proper post-press handling and avoid stretching the fabric while hot. This fidelity to time, temperature, and pressure is central to achieving reliable results in heat transfer for clothing.
Care, Troubleshooting, and Longevity of UV DTF Transfers
Proper cure time and fabric choice influence long-term wear. Let the print cure fully after transfer before washing, and turn clothing inside out to reduce abrasion. Use appropriate detergents and low-heat drying to preserve color and bond over multiple wash cycles.
Common issues include fading colors, edge cracking, peeling, or smudges. Troubleshooting involves confirming cure times, curing uniformity, and verification of bond with the fabric. In many cases, re-pressing or applying a compatible clear overlay finish after cure can improve durability and extend the life of the design in DIY apparel printing.
Frequently Asked Questions
What is UV DTF transfer and how does it differ from traditional Direct-to-Film transfers in a UV DTF transfer tutorial?
UV DTF transfer uses UV-curable inks printed on a special film, which is cured with UV light and then pressed onto fabric. This yields sharp details, vibrant colors, and strong wash durability, often outperforming traditional Direct-to-Film transfers on many fabrics. It’s a central technique in at-home UV transfer workflows and is commonly covered in UV DTF transfer tutorials.
How can UV printing on fabric be implemented in DIY apparel printing using UV DTF transfer methods?
Start with a design in RGB, print the artwork on UV DTF film with UV-curable inks, cure the film with a UV light source, then transfer it to the garment using a heat press. This approach brings UV printing on fabric into DIY apparel printing, delivering bold colors and a soft hand on cotton, blends, and select synthetics.
What essential equipment do I need for UV DTF transfer as part of heat transfer for clothing?
Essential items include UV DTF film and compatible transfer sheets, UV-curable inks, a UV-capable printer (or a DTF printer with a UV curing module), a curing lamp, a heat press, weeding tools, scissors, a lint roller, protective masking tape, a lint-free cloth, and a heat-resistant mat. Optional extras like finishing sprays can boost wash durability for UV-cured inks.
What design considerations should I keep in mind for UV DTF transfer when using UV printing on fabric on dark fabrics?
For dark fabrics, plan a white underbase or high-contrast design to preserve vibrancy. Work in RGB and convert to your printer’s profile, mirror the image if required, and include a print-safe margin. These steps help achieve strong color density and clean edges with UV DTF transfer on dark fabrics.
How long should curing take and how can I ensure durable results for DIY apparel printing with UV DTF transfer?
Follow your ink and film manufacturer’s cure times using a UV curing unit, and perform a test cure to dial in exposure. After transfer, allow a full cure window (often around 24 hours) before washing, turn garments inside out, use mild detergents, and air-dry to maximize durability in DIY apparel printing.
What common issues can occur with UV DTF transfer and how can DIY apparel printing troubleshoot using Direct-to-film transfers?
Common issues include fading after washing, edge cracking, peeling, smudging, and white underbase problems on dark fabrics. Troubleshoot by adjusting cure time and UV exposure, verifying even heat contact, re-pressing with correct settings, performing cold peel tests, and ensuring appropriate white underbase or design density for darker fabrics in your Direct-to-Film transfer workflow.
| Aspect | Key Points |
|---|---|
| What is UV DTF transfer? |
|
| Materials and equipment |
|
| Design and file preparation |
|
| Printing on UV DTF film |
|
| Curing the printed film |
|
| Transferring to fabric |
|
| Post-transfer care |
|
| Troubleshooting common issues |
|
| Design tips |
|
| Durability and long-term wear |
|
| Workflow notes |
|
Summary
UV DTF transfer opens the door to vibrant, durable apparel designs created at home, blending digital precision with the practicality of heat-set transfers. This topic overview covers the essentials from design to curing and transfer, highlighting the materials, steps, and best practices for reliable results. By using UV-curable inks on film and applying them with a heat press, UV DTF transfer delivers sharp details, rich color, and a soft hand on a range of fabrics, offering a compelling alternative to traditional screen printing. With careful calibration, proper curing, and mindful post care, you can produce professional-looking apparel that holds up through many wash cycles. Experimentation and iteration will help tailor the process to your fabric types and artwork, unlocking the full potential of UV DTF transfer for creative DIY projects.