
UV DTF transfer is redefining how designers print vibrant graphics on garments. This method blends sharp detail with broad fabric compatibility, and works well on a range of textiles for apparel. If you’re exploring this technology, the guide explains what it is and how it relates to traditional methods. We offer a practical, step-by-step look at how to apply UV DTF transfer and the heat press settings for UV DTF transfer. For those focused on apparel, you’ll find tips to optimize results—from color to durability—with UV DTF transfer for apparel.
Beyond the brand name, this approach uses UV-curable inks on a transfer film that bonds to fabric through heat and chemistry. In practical terms, digital textile printing with UV inks on a carrier sheet delivers crisp images and broad fabric compatibility. Alternative terms in line with LSI include UV ink transfer on textiles, print-on-film workflows with UV-curable chemistries, and ‘print then press’ sequences. Understanding these variations helps designers choose the right method for apparel, home textiles, or branded merchandise while optimizing color, longevity, and cost.
Understanding UV DTF transfer for apparel: what it is and why it matters
UV DTF transfer is a digital transfer method that uses UV-curable inks printed onto a transfer film. The design is then bonded to fabric through a combination of adhesive properties and heat or UV curing, depending on the workflow. For apparel, this technique delivers vibrant color, precise detail, and good fabric compatibility, making it a strong option for T-shirts, hoodies, bags, and other textiles. It also supports complex color gradients and fine lines that can be challenging with some other methods.
Compared with traditional methods like screen printing or standard DTF, UV DTF transfer often offers a more compact production process and easier setup for small to mid-sized runs. This makes it particularly appealing for custom apparel and textiles where turnaround time, asset fidelity, and wash durability matter. Beyond clothing, the same approach works well for home textiles and fabric panels that require durable, high-resolution graphics.
Design prep and artwork for UV DTF transfer on apparel
Effective design prep starts with high-resolution artwork, ideally 300 DPI at the final print size. Vector elements work best for logos and typography to preserve sharp edges, while raster images should stay crisp at the target size. Plan for a white or light underlayer when designing for dark fabrics to improve opacity and color vibrancy.
Color management is essential. Use appropriate profiles (such as sRGB or Adobe RGB) and consider bleed and safe margins to prevent edge cuts during transfer. Test prints on swatches help confirm how colors translate to fabric texture, ensuring that fine details remain legible and consistent across batches.
Materials, workflow, and curing: printing UV DTF transfers on textiles
A practical UV DTF workflow starts with a printer capable of UV-curable inks and a compatible transfer film plus adhesive system designed for textiles. You’ll also need a heat press or flatwork press with reliable temperature control and a scrap swatch for pre-run testing.
The workflow typically includes printing onto the transfer film, applying any adhesive or powder if required, curing the print, pre-warming the fabric, and then precisely aligning the transfer. The final bond is achieved through heat (and sometimes UV curing). Following the manufacturer’s guidelines and testing on swatches helps minimize misregistration and ensures consistent color and adhesion across garments.
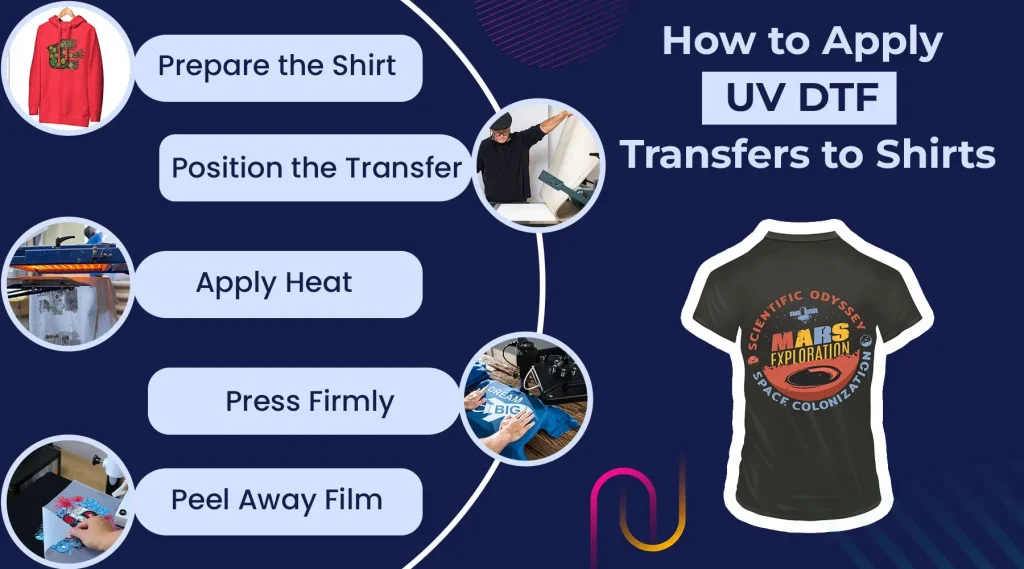
How to apply UV DTF transfer: a step-by-step guide
This practical guide outlines a baseline process for applying UV DTF transfers. Start by preparing the artwork and print file, ensuring correct size and embedded color profiles. Print on the UV transfer film with the selected inks and let the print cure or dry per your system’s instructions.
Next, apply any adhesive or powder as required, cure the film if the workflow calls for it, and preheat the garment. Align the transfer on the fabric, then press at the recommended temperature, time, and pressure. After pressing, peel the carrier film according to your system’s guidance, and allow the garment to cool before a light post-press to finalize the bond.
Heat press settings for UV DTF transfer: tips for fabrics and outcomes
Heat press settings are a critical factor in durability. For light to medium-weight cotton and cotton blends, a typical range is around 165–175°C (329–347°F) for 10–15 seconds with medium to firm pressure, using a protective sheet if needed. For darker fabrics or heavier blends, start with slightly lower pressure and adjust dwell time to avoid scorching while maintaining color saturation.
Polyester and poly blends may require lower temperatures or shorter times depending on the UV ink formulation and adhesive. Always test on swatches, and follow the specific guidelines of your transfer system. After pressing, allow the garment to cool completely and avoid washing for 24–48 hours to help the bond stabilize.
UV DTF transfer vs traditional DTF: performance, best fabrics for UV DTF transfer, and durability
UV DTF transfer offers several distinctive advantages over traditional DTF, including sharper color, finer detail, and often faster post-processing. Curing can be performed with UV light, increasing workflow speed in some setups and reducing the risk of smudging. The result is a print that can feel closer to a direct-to-fabric print while maintaining the flexibility of transfer-based methods.
When selecting fabrics, the approach matters. The best fabrics for UV DTF transfer are smooth, stable surfaces such as 100% cotton or cotton blends, while textured fabrics may show texture through the print. For long-term durability, choose fabrics and adhesives designed for textile use, test swatches first, and follow care instructions to preserve color and adhesion across washes.
Frequently Asked Questions
What is UV DTF transfer for apparel and how does it compare to traditional DTF?
UV DTF transfer for apparel is a digital transfer method that uses UV-curable inks printed onto a transfer film. The design is bonded to fabric through heat or UV curing, delivering vibrant color and fine detail with strong adhesion across many fabrics. Compared with traditional DTF, UV DTF often offers a more compact workflow, crisper color reproduction, and faster curing, though results still depend on fabric type and the adhesive system used.
How to apply UV DTF transfer?
Start by preparing artwork at high resolution and printing it on UV DTF transfer film with UV-curable inks. If your system uses powder or adhesive, apply it as directed and shake off the excess. Cure the printed film if required by the ink system. Preheat the garment and align the transfer on the fabric. Use a heat press at about 160-180 C for 10-15 seconds with medium to firm pressure. Peel the carrier film per your system, then allow to cool and finish with a light post-press if recommended.
What are the best fabrics for UV DTF transfer?
UV DTF transfer works best on smooth fabrics like 100% cotton and cotton blends. Some synthetic fabrics with compatible finishes also work well. Avoid heavy textured or pile surfaces like terry or fleece where transfer details may be less crisp. Always test on fabric swatches before committing to full runs to verify adhesion and color fidelity.
What are heat press settings for UV DTF transfer?
Typical ranges: for light to medium weight cotton and cotton blends, 165-175 C for 10-15 seconds with medium to firm pressure. For dark fabrics or heavier blends, reduce pressure and/or extend time slightly to prevent scorching. For polyester and poly blends, start with lower temperatures and shorter times and verify adhesion. After pressing, let the garment cool before handling and avoid washing for 24-48 hours to let the bond set.
UV DTF transfer vs traditional DTF: what are the differences and when should I choose each?
UV DTF uses UV-curable inks and a transfer film, delivering vivid color, fine detail, and strong adhesion with a potentially simpler workflow for small runs. Traditional DTF uses standard inks and a conventional heat transfer process, which can be more cost-effective for larger runs but may offer different texture and color behavior. Choose UV DTF for complex gradients and quick curing on textiles that require high color fidelity; choose traditional DTF when cost per unit and broader fabric compatibility are the main priorities.
What is a practical step-by-step workflow for UV DTF transfer printing for apparel?
A practical workflow includes: 1) prepare artwork at high resolution with proper bleed and color management; 2) print on UV DTF transfer film with UV inks; 3) apply any required powder or adhesive and remove excess; 4) cure the printed transfer as directed by the ink system; 5) preheat the garment; 6) align the transfer on the fabric and press at recommended temperature, time, and pressure (typical ranges: 160-180 C for 10-15 seconds); 7) peel the carrier film per system guidance (warm or cold peel); 8) cool and perform a light post-press if recommended. Always test on swatches before full production.
| Topic | Key Points |
|---|---|
| What UV DTF transfer is |
|
| Why it matters for apparel and textiles |
|
| What you need to print with UV DTF transfer |
|
| Design prep guidelines |
|
| Printing and curing workflow |
|
| Step-by-step application guide |
|
| Heat press settings by fabric type |
|
| Fabric compatibility and care |
|
| Troubleshooting: common issues and fixes |
|
Summary
UV DTF transfer offers a versatile option for custom apparel and textiles, delivering vibrant color, sharp detail, and broad fabric compatibility. By mastering the end-to-end workflow—from artwork prep and printing to curing, pressing, and finishing—you can achieve durable results suitable for small runs or personalized garments. The approach supports varied fabrics, clear edges, and consistent color across items when you test on swatches and optimize heat, time, and pressure for each fabric type. With careful care instructions and proper post-press handling, UV DTF transfers maintain appearance and wash durability over time. This makes UV DTF transfer a practical balance of quality, efficiency, and creative possibility for apparel projects and beyond.