
UV DTF transfer on T-Shirts offers vibrant color, durability, and a workflow accessible to hobbyists and pros alike. This method moves bold designs onto cotton, blends, or poly-blends with heat and pressure, avoiding the higher costs of screen printing. Understanding the DTF transfer steps for apparel helps you predict color fidelity, adhesion, and wash durability. The guide outlines the essential tools and a straightforward workflow so beginners can achieve pro-like results without guesswork. By following tested heat settings and careful post-press care, you’ll minimize errors and maximize durability across multiple washes.
Think of this as a modern heat-transfer technique using UV-curable inks on a printable film that bonds to textiles. Instead of traditional screen printing, you’re moving a full-color image from a coated sheet onto fabric through controlled heat, time, and pressure. From a search-engine perspective, this approach aligns with terms like digital garment graphics, film-to-fabric transition, and post-bond curing to help readers discover the method. Careful attention to the curing process, substrate choice, and garment prep ensures durability through many washes. Practitioners can optimize results by testing different fabrics, inks, and powders, then documenting heat-press parameters and timing for consistent production.
UV DTF Transfer on T-Shirts: A Bright, Durable Path to Custom Tees
UV DTF transfer on T-Shirts combines UV-curable inks with a direct-to-film workflow to deliver vibrant colors and strong adhesion on cotton, blends, and poly-blends. This method offers a compelling alternative to screen printing for hobbyists and professionals, enabling bold designs with relatively simple equipment and steps. The result can be a durable finish that stands up to repeated wear and washing when proper care is observed.
In practice, the process follows a familiar DTF path: design, print onto UV-friendly film, bond with an adhesive powder, cure, and then transfer with heat and pressure. Key to success is a calibrated workflow, including color management and appropriate heat press settings, which help preserve color fidelity and edge sharpness. A good UV DTF transfer on T-Shirts begins with clear expectations about film compatibility, under-base needs, and curing requirements to maximize the final appearance.
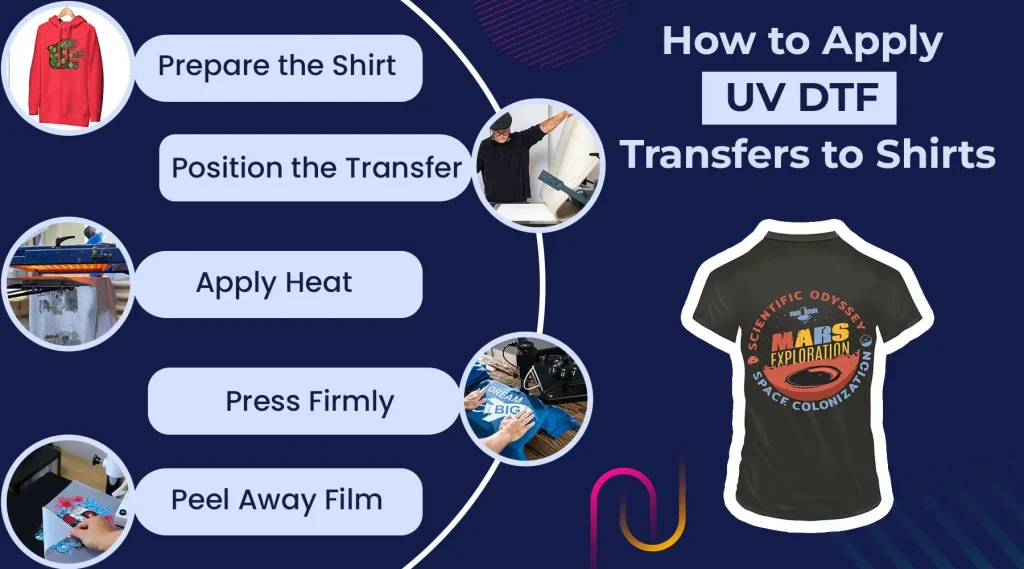
DTF transfer steps for apparel: From design to finished shirt
DTF transfer steps for apparel guide you from concept to a wearable print. Start with a high-quality design, consider color separations for under-bases, and mirror the image if needed for direct transfers. Printing onto UV inks on film sets the stage for strong color saturation and deep blacks, which is especially important on white or light fabrics.
The process continues with applying a thin layer of adhesive powder, curing it per the manufacturer’s guidance, and performing a careful pre-press to create a smooth transfer surface. These steps reduce print edges lifting and help the final image adhere uniformly to the garment, setting the foundation for a professional-looking result.
Heat press settings for DTF transfers: Finding the sweet spot for different fabrics
Heat press settings for DTF transfers depend on fabric type, film, and ink brand. Typical starting points are around 300-320°F (150-160°C) with a dwell time of 10-20 seconds and medium pressure, but exact values should come from the film manufacturer and ink supplier. Testing on a scrap or sample tee helps you dial in the right balance between bond strength and fabric integrity.
Adjustments may be required for thicker garments, blends, or darker fabrics, where you might need slightly longer dwell times or more even pressure to ensure full transfer. Always verify that you’re following safe operating procedures, and perform small tests to prevent edge lifting, color shift, or scorching. The goal is reproducible results across batches while protecting fabric performance.
Applying DTF prints to shirts: Alignment, media handling, and finishing touches
Applying DTF prints to shirts requires careful alignment and stability. Position the transfer with the design facing the fabric, using a heat-resistant sheet and light adhesive or tape to keep the film from shifting. A stable pre-press, clean surface, and precise placement are essential for crisp edges and accurate image placement.
After pressing, select the appropriate peel method (warm or cold) based on the film and adhesive system, then perform any recommended post-press cure to maximize adhesion and wash durability. Handling the shirt correctly during cooling and storage helps prevent edge lift and ensures the print remains vibrant through many wears.
UV DTF transfer troubleshooting: Common issues and fixes
UV DTF transfer troubleshooting covers common issues like faint colors, edge lift, cracking, and misalignment. Start by verifying ink coverage and uniform adhesive powder application, then reprint with slightly higher opacity or run a test strip to confirm color saturation on the target fabric. Proper alignment fixtures and a flat pre-press surface help mitigate misregistration.
Additional fixes include checking heat, dwell time, and pressure to improve edge retention and adhesion. If cracking occurs, review fabric tension and transfer duration; if colors bleed, revisit color management and ensure proper under-base and top-color layering. A systematic approach to troubleshooting saves material and time during production.
DTF print to fabric guide: Care, curing, and long-term performance
DTF print to fabric guide emphasizes curing, post-transfer care, and long-term performance. Once the transfer is complete, allow the garment to cool fully and follow the manufacturer’s care guidelines to maximize wash durability. Turning the shirt inside out and washing on gentle cycles helps preserve color, while avoiding high-heat tumble drying in the first washes reduces edge wear.
A robust long-term approach includes regular equipment maintenance, proper storage of films and inks, and batch-consistency controls. By calibrating color across runs and documenting heat, time, and pressure settings, you can reproduce reliable results and build a scalable workflow for UV DTF transfers on a range of fabrics.
Frequently Asked Questions
What are the DTF transfer steps for apparel when using UV DTF transfer on T-Shirts?
This UV DTF transfer on T-Shirts workflow follows the DTF transfer steps for apparel: design preparation with color management; print the design onto UV‑curable DTF film; apply an adhesive powder and cure; pre‑press the garment to remove moisture; position the transfer with the printed side toward the fabric and cover with a heat‑resistant sheet; heat press at about 300–320°F (150–160°C) for 10–20 seconds with steady, even pressure; peel according to film (warm or cold) and perform a brief post‑press cure if required; finally allow the print to cool and follow fabric care guidelines to maximize longevity.
How do you adjust heat press settings for DTF transfers on UV DTF transfer on T-Shirts?
Begin with the film and ink manufacturer guidelines and then fine‑tune: typical heat press settings for DTF transfers are 300–320°F (150–160°C) for 10–20 seconds with medium pressure. Adjust for fabric thickness, ink film texture, and your press’s platen, and always test on scrap fabric before production. If UV inks bond differently or you’re using a thicker transfer layer, you may need a slightly longer dwell time or a small pressure tweak while keeping within suggested ranges.
What is the best method for applying DTF prints to shirts when using UV DTF transfer on T-Shirts?
To apply DTF prints to shirts with UV DTF transfer on T-Shirts, place the transfer on the shirt with the printed side facing the fabric, then cover with a heat‑resistant sheet and tape to prevent shifting. Pre‑press the garment briefly to remove moisture, then heat‑press at the recommended temperature and time with even pressure. After transfer, perform the appropriate peel (warm or cold) and a brief post‑press cure if required, and let the shirt cool before handling.
What are common UV DTF transfer troubleshooting steps for UV DTF transfer on T-Shirts?
Common issues and fixes include: faint or washed‑out colors—confirm ink opacity and powder adhesion; peeling edges or lifting—check post‑press cure and ensure full adhesion; cracking—adjust dwell time and fabric tension; ghosting or misalignment—recheck alignment aids and ensure a flat pre‑press surface; color bleeding—verify color separation and under‑base settings. Always start with test prints and document the results.
Is there a DTF print to fabric guide for UV DTF transfer on T-Shirts?
Yes. A DTF print to fabric guide for UV DTF transfer on T-Shirts covers fabric choice (cotton and blends work well), fabric prep with a pre‑press, film and UV ink compatibility, color management (calibrated workflow), under‑base considerations for darker fabrics, and post‑press care to maximize wash durability. Begin with simple tests on scrap tees to dial in heat, pressure, and time.
What factors influence color fidelity and durability in UV DTF transfer on T-Shirts during the DTF transfer steps for apparel?
Color fidelity and durability depend on several factors: film/ink compatibility, accurate color management, precise heat press settings (temperature, time, and pressure), fabric type and thickness, proper adhesive curing, and appropriate post‑press curing and wash guidelines. Regular calibration, standardized workflows, and test prints help ensure batch consistency and long‑lasting results.
| Topic | Key Points |
|---|---|
| What is UV DTF transfer on T-Shirts? | Direct-to-film with UV-curable inks; a design is printed on a DTF film and transferred to fabric using heat and pressure, yielding bright colors and crisp details on light fabrics. |
| Why it matters | Offers vibrant results on cotton blends and light fabrics with a cost-effective, scalable workflow that suits hobbyists and professionals. |
| Prerequisites / What you’ll need | High-quality design (vector or 300 dpi+); UV DTF film designed for UV inks with compatible adhesive powder; heat press or conveyor press; UV curing/drying setup; heat-tolerant surface; PPE and clean workspace. |
| High-level step-by-step workflow | Prepare design and print settings; apply adhesive powder and cure; pre-press garment; position transfer; apply heat and dwell; peel and post-press cure; care after transfer. |
| Troubleshooting / Common issues | Faint colors, peeling edges, cracking, ghosting, color bleed; fix by adjusting opacity, ensuring uniform adhesive powder adhesion, proper cure, precise alignment, and calibrated heat/pressure. |
| Best practices | Do test prints; calibrate color and settings; standardize workflow with templates; ensure film/ink compatibility; maintain safety and equipment cleanliness. |
| Advanced tips | Design for transfer with vector art; try different UV DTF films for thickness/tack; emphasize edge control; batch consistency using jigs or templates. |
Summary
UV DTF transfer on T-Shirts opens vibrant, durable printing options for custom apparel. By mastering the heat, pressure, and post-press care workflow, you can achieve pro-grade results across a range of fabrics. This method combines color fidelity with practical efficiency, making it suitable for small runs, hobbyists, and small businesses alike. Remember to test, calibrate, and iterate with your specific film and inks to optimize adhesion, wash durability, and edge fidelity. With patience and a solid process, UV DTF transfer on T-Shirts can deliver eye-catching designs that withstand repeated wear and washing.