
Patching clothes opens a doorway to sustainable style, turning worn fabrics into fresh, durable pieces you’ll reach for again and again, and it invites you to see every tear as an opportunity rather than a setback. If you’re wondering how to patch clothes, this guide breaks down materials, basic techniques, and care tips so beginners feel confident and experienced sewers find new ways to make repairs durable and stylish. Understanding the types of fabric patches helps you balance reinforcement with style, whether you’re patching denim, knit, or canvas, and it reveals how texture, weight, and backing influence adhesion and longevity. Our sewing patches guide compares iron-on and sew-on options, offers a quick checklist, and shares best practices for secure borders, edge finishing, and reinforcing high-stress zones, so every repair stays intact through wash after wash. Finally, consider ways to personalize and extend wear with creative, durable patching that blends into the garment and tells your story.
Beyond simple repairs, patching clothes can be seen as garment mending that preserves personal favorites and reduces waste by transforming worn areas into intentional details. Think of it as textile restoration and upcycling, where you add durable patches, decorative motifs, and reinforced stitching to extend life while expressing your style. This approach aligns with sustainable fashion, making repair a creative practice that blends utility with design, so your wardrobe remains fresh without buying new pieces.
How to Patch Clothes: A Beginner’s Guide to Repair and Personalize
Patching clothes is a practical entry point into sustainable fashion, offering a path to extend the life of beloved garments. For anyone wondering how to patch clothes, start with simple repairs and a few creative touchpoints that can transform wear into a small work of textile art. This guide-style approach emphasizes clear steps, safety, and patience, so you can build confidence while keeping your wardrobe intact and character-filled.
Patching clothes is more than a repair technique—it’s a gateway to personal expression and mindful consumption. In this starter overview, you’ll learn how to assess fabric, select suitable patches, and plan placements that balance durability with design. By embracing both function and flair, you can turn a worn elbow or a faded knee into a signature detail that invites second and third wears, reducing waste and redefining what it means to mend.
Choosing the Right Types of Fabric Patches for Every Garment
Understanding the types of fabric patches is crucial for durability and aesthetics. This section covers iron-on patches, sew-on patches, embroidery patches, and decorative patches, helping you decide which option suits denim, cotton, or delicate knits. When choosing patches, consider how they will interact with fabric weight, wash frequency, and the garment’s use—whether casual wear, workwear, or outerwear—to ensure long-lasting results.
Selecting patches also involves considering patch ideas that fit your style and the garment’s needs. For high-stress areas, reinforcements work best when paired with a sturdy patch repair technique, while decorative patches shine on hems or pockets without compromising comfort. By weighing fabric compatibility and patch weight, you can achieve a balanced look that stays secure through daily wear.
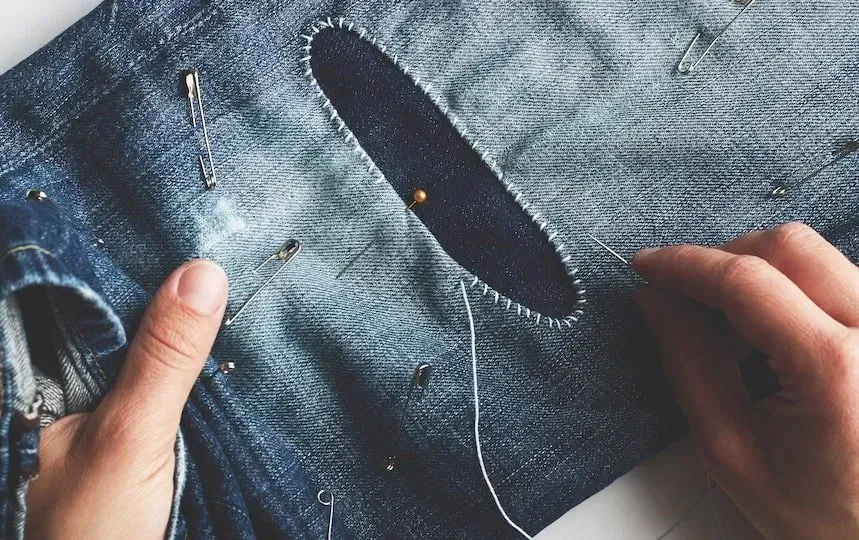
A Comprehensive Sewing Patches Guide: Techniques for Durable Results
This sewing patches guide covers essential techniques that transform a simple patch into a lasting repair or embellishment. Key methods include edge stitching for durability, blanket stitches around the perimeter, and subtle zigzag stitches on knits. Whether you’re patching a jean knee or a pocket, mastering these stitches helps patches resist fraying and lifting after washing.
Beyond basic stitching, you’ll learn how to combine methods for added security, such as starting with a fusible backing for alignment and then sewing around the edge for reliability. The guide also emphasizes testing a patch on a scrap fabric before applying it to your garment, ensuring you get the tension, stitch length, and adherence just right for your fabric type.
Patch Repair Techniques for High-Wear Zones: Elbows, Knees, and Seats
High-wear zones deserve reinforced patches that withstand daily movement. In this section, you’ll explore patch repair techniques designed for elbows, knees, and seat areas, with practical tips on choosing larger patches and layering for extra protection. By planning placement and reinforcing edges, you reduce the risk of future tears and maintain a comfortable fit.
A well-executed repair combines inside-out stability and outside-facing aesthetics. Techniques include applying a backing fabric to distribute stress, sewing around the patch with a tight stitch, and adding a second row of stitches on the inner side for extra durability. When done thoughtfully, even rugged patches become nearly invisible during regular wear, preserving both function and form.
Creative Fabric Patch Ideas: Color, Texture, and Personal Style
Creative fabric patch ideas invite experimentation with color, texture, and pattern to reflect your personality. This section highlights ideas such as contrasting embroidery patches on denim jackets, patchwork on pockets, and layered repairs that create a retro or punk-inspired vibe. By mixing different fabrics—denim, felt, leather, or canvas—you can craft a patchwork story that’s uniquely yours.
Fabric patch ideas also extend to subtle enhancements rather than bold statements. Consider tonal patches that echo the garment’s color palette or minimalist patches that add reinforcement without overpowering the silhouette. A thoughtful combination of patches can balance aesthetics with durability, turning everyday wear into a curated, wearable piece.
Care and Longevity: Maintaining Patched Garments for Everyday Wear
Patched garments require thoughtful care to maintain adhesion and appearance. This section covers washing practices, recommended detergents, and drying methods that protect patches from loosening or fading. Following a gentle cycle and air drying when possible helps preserve both patch integrity and fabric softness, ensuring your repairs look fresh wear after wear.
Long-term longevity comes from proactive maintenance and periodic reinforcement. Inspect patches after several washes, resew edges if you notice lifting, and add extra support on high-stress areas when needed. By treating patched garments with care and revisiting repairs over time, you extend their life, reduce waste, and keep your wardrobe resilient and stylish.
Frequently Asked Questions
How to patch clothes effectively? What are the essential steps for durable results when patching clothes?
Start by assessing the damage and planning patch placement. Choose a patch that fully covers the area with at least 1/2 inch of margin. Prep the fabric by trimming loose threads and washing if needed. Position the patch and secure with pins or clips. Attach the patch using iron-on heat and pressure or sew-on stitches, then reinforce the edge with a close stitch such as running or blanket stitch. Finally, check flatness, trim any loose threads, and wash gently to test durability.
What are the types of fabric patches for patching clothes, and when should you use them?
Common types include iron-on patches for quick fixes on denim and sturdy cotton, sew-on patches for high-wear areas, embroidered patches for personalization, decorative patches for style, and repair/reinforcement patches for strengthening thin fabric. Choose patch type based on fabric weight, wash durability, and the desired look. For delicate fabrics, use lighter patches or sew-on with careful stitching; for heavy fabrics, larger patches with reinforced edges work well.
What is a sewing patches guide for beginners tackling patching clothes?
A beginner-friendly sewing patches guide starts with choosing a patch and deciding whether to patch from the inside or outside. Gather tools: patches, thread, needle, scissors, pins, and an iron if needed. Align the patch, secure it, then sew around the edge with a simple running stitch or a zigzag. For durability, add a second stitching line on the inside and test wash after finishing.
What patch repair techniques work best for high-wear areas when patching clothes?
Use reinforcement patches over stressed zones like elbows or knees. Sew around the edge with tight stitches such as a blanket stitch or dense zigzag. Consider adding a second inner stitch line and a backing fabric to distribute load. If needed, apply fusible web for extra hold, then finish with edge stitching to prevent lifting.
What fabric patch ideas can inspire patching clothes for style and durability?
Try color-contrasting patches on denim jackets, mix embroidery patches with plain fabric for texture, layer patches to create patchwork on pockets or yokes, or place patches over seams for reinforcement and flair. Choose fabric patch ideas that match fabric weight and care instructions, and consider applying patches to hems, pockets, and sleeves for both function and fashion.
How should you care for patched garments to maximize longevity after patching clothes?
Turn patched garments inside out before washing, use a gentle cycle, and air dry when possible to protect patches. For decorative patches, handle with care to preserve embroidery. Periodically inspect edges and re-stitch any loose seams. Store away from direct sunlight to prevent fading and wear over time.
| Aspect | Key Points |
|---|---|
| Introduction | Patching clothes is a versatile, practical, creative, and sustainable skill that extends garments you already own, adds personality, and reduces waste. |
| Why Patch Clothing? Environmental and Budget Benefits | Reduces textile waste; reinforces high‑stress areas; cost‑effective; enables customization; supports mindful consumption and a fun, creative hobby. |
| Tools, Materials, and Prep | Patches (iron‑on, sew‑on, embroidery) in various fabrics; thread, needle, scissors; iron/board; fusible web; pins/clips; markers; seam ripper; organized workspace. |
| Types of Patches | Iron‑on, sew‑on, embroidered, decorative, and repair/reinforcement patches; selection depends on fabric; lighter patches for delicate fabrics; heavier patches for denim; edge stitching for durability. |
| Step‑by‑Step Process | Assess damage and plan placement; choose patch size with margin; prep fabric; prep patch; position and secure; attach patch via iron‑on, sew‑on, or mixed approach; reinforce edges; finish and care instructions. |
| Common Mistakes | Patch too small; inadequate fabric prep; using incompatible patch; skipping edge stitching; overheating or incorrect ironing. |
| Maintenance and Care | Wash gently, air dry; reinforce edges over time; store away from direct sunlight to prevent fading; consider extra stitching for durability on heavy fabrics. |
| Creative Ideas and Projects | Elbow patches as signature details; combine multiple patches for retro/punk looks; patchwork pockets or yokes; mix functional reinforcement with decorative patches for flair. |
Summary
This table summarizes the core ideas from the base content about patching clothes, including motivations (environmental, budget, customization), the tools and patch types involved, a practical step‑by‑step method, common pitfalls, care considerations, and creative project ideas.