
Custom Embroidered Patches are portable ambassadors for a club, brand, or hobby, delivering a compact story with lasting durability. Understanding the basics of custom embroidered patches design helps you translate a concept into a badge that looks intentional from afar. This guide covers patch customization ideas, embroidery quality, and the latest embroidered patch design trends to keep your patches current. Whether you’re working with a vendor or tackling a DIY project, following professional patch production tips can improve color, stitch, and durability. By focusing on clarity, contrast, and appropriate backing, you’ll set the stage for patches that endure wash cycles and wear.
From a semantically minded perspective, you can think of these items as decorative insignias, appliqué patches, or embroidered emblems that convey identity. Using related terms such as ‘badges’ or ‘patches’ in different sizes and textures helps plan design constraints and production steps. DIY embroidered patches show how hobbyists can experiment at home, while professional patch production tips reveal scalable, color-accurate results. This broader framing supports a web of related concepts—customizable patches, textile embellishments, and branding elements—that make the content useful to both makers and brands. With the right approach, readers learn how to move from idea to finished patch with confidence, whether for personal projects or large orders.
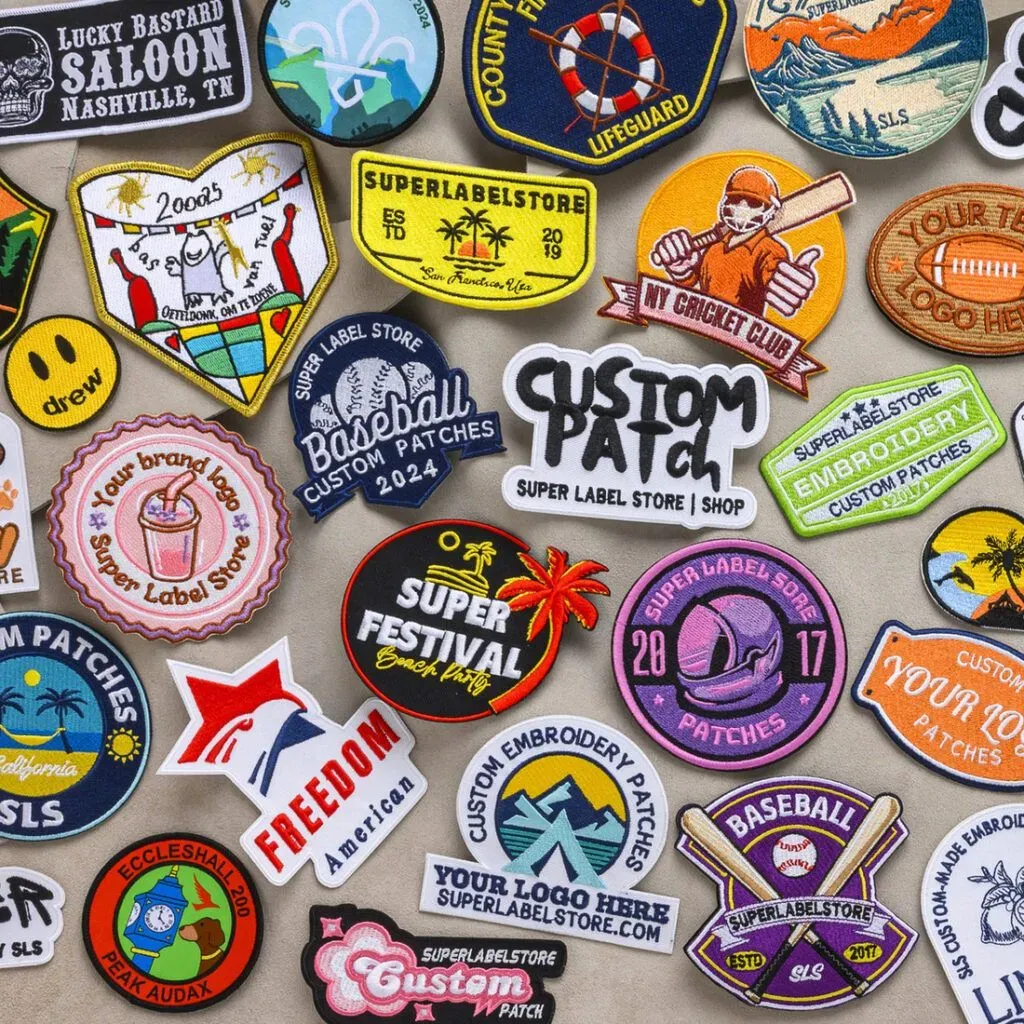
Custom Embroidered Patches: Designing with Purpose
Custom Embroidered Patches are more than decorative accents; they act as portable ambassadors for a brand, team, or hobby. Starting with a clear concept—defining the patch’s core message, target usage (jerseys, jackets, bags), and size constraints—helps translate concept into a high-impact patch. This upfront clarity is a cornerstone of effective custom embroidered patches design, shaping how the patch communicates from a distance and up close.
With teams or brands, a well-formed brief should cover color considerations, typography, and preferred backing types. Aligning the brief with your patch customization ideas ensures the final patch reads well on various fabrics and remains legible when scaled. Emphasizing design decisions that fit your brand identity is a practical application of the patch customization ideas in the broader context of custom embroidered patches design.
From Concept to Vector: Artwork Preparation for Embroidered Patches
For any project in custom embroidered patches design, begin with clean vector artwork (AI, EPS, or SVG) so lines stay sharp at multiple sizes. Convert fine details into bold, readable shapes since patches are often viewed at a distance. Keeping your color usage practical also supports embroidered patch design trends by delivering legible, production-friendly results.
Consider contrast and legibility by testing color pairings against light and dark backings. Plan stitch types—satin for outlines, fill stitches for large fields, and careful backstitching for fine elements—which together influence durability and the tactile feel. In practice, these choices align with professional patch production tips that balance aesthetics with manufacturability, even when you’re doing DIY embroidered patches.
Digitizing for Durability: Turning Artwork into Stitch Language
Digitizing translates your artwork into stitch language that sewing machines can execute consistently. A clean digitization reduces puckering on delicate fabrics, with careful density control and deliberate stitch directions that create depth without bulk. This is a core aspect of professional patch production tips, ensuring patches perform well across wear and washing.
If you’re exploring DIY embroidered patches, digitizing can feel intimidating, but there are approachable software options and service providers that help hobbyists achieve quality results. The goal remains producing a stitch file that preserves your design integrity while remaining smooth to sew on a range of fabrics.
Materials, Backings, and Edges: Selecting Patch Finishes
Fabric choices—twill, felt, and twill-backed options—define the patch’s texture and stiffness, influencing how it sits on clothing and how clear the embroidery looks. Backing options (sew-on, iron-on, or adhesive) offer different installation experiences, so choosing the right backing supports the patch’s intended use and longevity.
Edge finishes range from Merrowed (overlocked) borders to laser-cut silhouettes. The finish shapes durability and silhouette, and it ties into patch customization ideas about how bold or subtle a patch appears. Selecting a cohesive combination of fabric, backing, and edge finish helps ensure the final patch matches your design objectives and practical needs.
Trends and Tactics: Embroidered Patch Design Trends and Customization Ideas
Staying current with embroidered patch design trends can spark fresh ideas while honoring core design principles. Expect simplified logos with bold outlines for quick recognition, high-contrast palettes, and a growing interest in mixed textures like holographic accents or felt combinations. Emphasis on sustainable threads and fabrics also resonates with eco-conscious brands, aligning with patch customization ideas for many projects.
To apply these trends without sacrificing identity, balance is key: maintain legibility, respect color consistency, and ensure patch shapes support wear and function. Integrating embroidered patch design trends with solid fundamentals helps you deliver patches that feel contemporary while remaining durable. This approach supports both custom embroidered patches design goals and practical patch customization ideas.
DIY vs Professional Production: Choosing Your Path for Quality
DIY embroidered patches offer hands-on learning, rapid experimentation, and the joy of making by hand. It’s ideal for small runs, prototype patches, or personal projects where you want control over stabilizers, hooping, and backings. However, when scale, color precision, and consistent production are needed, professional patch production tips point toward working with a vendor who can deliver repeatable quality.
Assess your needs by quantity, deadline, and brand standards: large runs with exact Pantone colors often justify professional production, while small, creative experiments can stay in the realm of DIY embroidered patches. Regardless of path, applying the core design principles—clear vision, robust digitizing, and thoughtful material choices—produces patches that tell your story reliably and beautifully.
Frequently Asked Questions
What are Custom Embroidered Patches and how does the custom embroidered patches design process unfold?
Custom Embroidered Patches are small fabric patches with decorative embroidery used to promote a brand, team, or hobby. The custom embroidered patches design process starts with a clear brief, followed by vector artwork, color simplification, digitizing, and sew-out testing. Choose backing and edge finish early to ensure legibility and durability.
What are practical patch customization ideas for Custom Embroidered Patches to stand out?
Explore patch customization ideas by varying shapes, textures, and color schemes to make Custom Embroidered Patches memorable. Consider irregular or die-cut shapes, mixed materials (embroidered patches with felt or holographic accents), bold outlines, and contrasting backgrounds. Plan with a simple color palette to keep production efficient.
What embroidered patch design trends should guide Custom Embroidered Patches?
Stay current with embroidered patch design trends when planning Custom Embroidered Patches. Look for simplified logos with bold outlines, high-contrast color palettes, and mixed textures, such as combining embroidery with felt or holographic threads. Trend-aware design should still prioritize readability from a distance.
What professional patch production tips apply to Custom Embroidered Patches?
Professional patch production tips for Custom Embroidered Patches include providing a precise brief, requesting proofs, and using color management with Pantone references. Manage stitch density, choose appropriate backing, and select edge finishing that suits the patch shape. A clear QA checklist helps ensure consistent quality across runs.
Can I create DIY embroidered patches that still meet professional standards for Custom Embroidered Patches?
Yes—DIY embroidered patches can reach professional-looking results if you use proper stabilizers, hooping, backings, and careful testing. Start with simple designs, sew-outs on sample fabrics, and learn stabilizer and tension settings before scaling. When in doubt, consult a professional patch producer for production tips and guidance.
How should I select materials and finishes for Custom Embroidered Patches to balance durability and aesthetics?
Choose materials and finishes for Custom Embroidered Patches by balancing aesthetics, durability, and budget. Consider fabrics like twill or felt, backing options (sew-on, iron-on, adhesive), and edge finishes (merrowed or laser-cut). Align choices with patch customization ideas while testing for wash durability and colorfastness.
| Section | Key Points |
|---|---|
| Introduction | Embeds a brand/story in a durable, portable form; useful for sports clubs, business merch, or DIY projects; foundational knowledge helps achieve professional results. |
| Design Foundations | Define the core message and goal; capture the brief (target usage, size constraints, backing); align with brand identity to ensure legibility at distance and up close. |
| Design and Artwork | Create clean vector artwork (AI/EPS/SVG); simplify colors; maximize contrast for legibility; plan stitch types (satin outlines/fills, backstitching) for durability. |
| Digitizing | Translate artwork into stitch language; manage density to avoid puckering; assign stitch directions; use underlay; test sew-outs before production. |
| Materials and Finishes | Choose fabrics (twill, felt); backing options (sew-on, iron-on, adhesive); edge finishes (merrowed, laser-cut) to balance aesthetics, budget, and use. |
| Production Realities | Quote and proofing; pre-production sampling; color management with Pantone references; quality control to ensure consistency. |
| Trends and Practical Examples | Current trends include bold outlines, minimalist palettes, mixed textures, sustainable materials, and irregular die-cut shapes. |
| DIY vs Professional Production | DIY offers rapid prototyping and learning; professional production provides scale, color precision, and durable backing for large runs. |
Summary
Conclusion: Crafting patches that tell your story