
Embroidered design on linen offers a natural crispness and a subtle sheen that makes projects visually striking. When done well, linen embroidery looks polished, with clean lines and durable stitches that withstand regular washing and wear. Achieving clean, durable results starts with understanding the material, selecting the right tools, and applying proven techniques. In this guide, we will outline practical steps for creating linen embroidery that remains beautiful through time. By focusing on linen embroidery tips, stabilizers for linen, thread durability, and the differences between hand embroidery on linen and machine embroidery on linen, you will be prepared to elevate your project from good to excellent.
From another angle, this craft can be described as linen fabric stitching, flax-based weave embroidery, or textile needlework on natural fiber cloth. LSI-derived terminology links the idea to stabilizers for linen, thread durability, and care considerations, helping readers find practical advice even when wording varies. Whether you prefer hand embroidery on linen or machine embroidery on linen, the core principles—tension, stabilizer choice, and stitch selection—remain the same. Employing related terms broadens the topic’s reach and mirrors real-world search patterns, guiding you toward tips, projects, and beginner-friendly workflows. Examples include guidance on choosing a linen blend, selecting needle sizes, and testing stitch density on a practice piece to refine results.
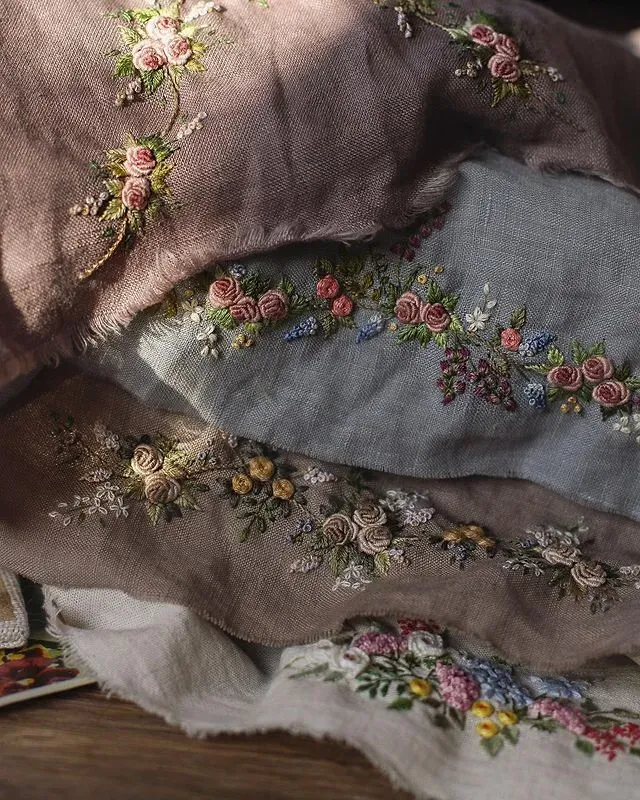
The Allure of the Embroidered design on linen: Texture, Sheen, and Lasting Impact
Embroidered design on linen offers a natural crispness and a subtle sheen that draws the eye and invites touch. Linen’s open, breathable weave provides a ready stage for color and texture to interact, so the design sits with clarity rather than sinking into the fabric. When you pair the right thread with a stable surface, the embroidery catches the light just enough to highlight the stitch work without overpowering the fabric.
To keep that crispness through time, you rely on linen embroidery tips and proper stabilization. The durability comes from not only the stitches but also how you prep and finish, including choosing thread durability and ensuring edges stay sharp after washing.
Choosing Linen for Embroidery: Weave, Weight, and Prep That Sets Your Project Up for Success
Start with a stable, even-weave linen. A medium weight—about 32–36 count in cross-stitch terms or 4–6 oz per square yard—provides a forgiving surface that still shows stitch definition. If you’re new to linen embroidery tips, pre-washed linen helps reduce distortion after washing and makes the fabric behave consistently under the needle.
Thread choice and stabilization are next. Cotton embroidery floss offers a classic, matte finish, while high-quality polyester threads deliver brighter colorfast results. Pair your thread with appropriate stabilizers for linen—tear-away for lighter designs, cut-away for dense fills, or wash-away for delicate work—and you’ll set up a foundation that honors the fabric’s texture and keeps stitches crisp.
Stabilizers for Linen: The Foundation of Clean, Stable Stitches
Stabilizers for linen are essential, especially as designs grow in size or density. A light tear-away under a thin linen surface helps prevent pull-through, while a cut-away stabilizer provides robust support for dense fills and longer stitches. For delicate linen or small details, a wash-away stabilizer can be a practical option, particularly when you plan to rinse the project after finishing.
Choosing the right stabilizer also affects how clean your edges remain during finishing. In hand embroidery on linen, you may rely on hoop stability and occasional re-hooping; in machine embroidery on linen, you’ll want to test density, stabilizer weight, and stitch length on scrap pieces to avoid puckering or show-through.
Hand Embroidery on Linen vs Machine Embroidery on Linen: Techniques, Tactics, and Tools
Hand embroidery on linen emphasizes control of tension and stitch placement. Start with simple backstitches for outlines, then use satin stitches for fills, and consider split stitches for texture. The linen weave adds a subtle texture that complements the stitch line, so aim for stitches that sit flush with the surface rather than catching on the weave.
Machine embroidery on linen requires even stabilizing and thoughtful tweaks to the machine settings. Test stitch length, speed, and needle type on a scrap, and balance thread density with the linen’s weave to avoid peeking through. The goal is to maintain steady lines and uniform coverage while respecting the fabric’s natural give.
Thread Durability and Colorfastness: Choosing Threads for Linen Embroidery
Thread durability guides how your linen embroidery will wear after repeated washing. Cotton embroidery floss gives a traditional matte look, while polyester or viscose blends can offer brighter, colorfast results that resist fading with time. Regardless of the choice, the thread should complement the linen’s texture rather than overpower it.
Consider colorfast testing and care instructions when selecting threads. Heavier or shinier threads may require different stabilizers or tension to prevent thread breakage and puckering, especially on linen’s natural weave. A durable thread paired with appropriate techniques ensures your design remains vibrant through multiple wash cycles.
A Quick-Start Project Plan for Linen Embroidery: From Idea to Finished Piece
Begin with a simple motif and a moderate linen weight. Pre-wash the fabric to remove sizing, and cut a generous margin to accommodate finishing. Interface with a light tear-away stabilizer for a clean base, transfer the design with a washable pen, and outline using a backstitch to lock the motif in place.
Then fill using satin or long-and-short stitches, keeping tension even and stitches sitting flat on the fabric. Finish by trimming stabilizers, washing gently if needed, and pressing with a protective cloth to preserve texture. This approach follows linen embroidery tips and aligns with stabilizers for linen to ensure a durable, crisp result.
Frequently Asked Questions
What are essential linen embroidery tips to achieve a high-quality embroidered design on linen?
Start with a stable, even-weave linen and pre-wash to reduce distortion. Choose threads that suit the look you want (cotton for a matte finish, polyester for colorfast brightness) and use the appropriate stabilizers for linen. Keep the fabric taut in a hoop and test your stitches on a scrap first to confirm clean lines and even tension.
How do stabilizers for linen influence an embroidered design on linen?
Stabilizers for linen provide the foundation to prevent pull-through and distortion, especially on larger designs. Use tear-away for light outlines, cut-away for dense fills, or wash-away stabilizers for delicate linen; adjust density and stabilizer choice to match your design. Always test on a scrap piece to avoid puckering.
What is the difference between hand embroidery on linen and machine embroidery on linen when creating an embroidered design on linen?
Hand embroidery on linen requires careful tension and stabilizing the fabric with a hoop, using simple stitches such as backstitch and satin stitch for clean lines. Machine embroidery on linen relies on stabilizers, tested stitch length and speed, and balanced thread color and density to sit well with the weave. Both paths aim for crisp edges and durable results.
How should thread durability influence choices for an embroidered design on linen?
Thread durability matters: choose cotton embroidery floss for a matte look or polyester threads for colorfast, machine-washable results. Ensure the thread complements the linen’s texture and withstands multiple washes without fading or fraying. Verify colorfastness and match the thread to your chosen needle and stitch type.
Which linen weight and prep steps optimize a crisp embroidered design on linen?
Choose a stable, even-weave linen around 32–36 count (4–6 oz) and pre-wash to reduce distortion. Pair with appropriate stabilizers and a fabric-friendly needle, and hoop the fabric taut without overstretching. Do a test piece to tune stitch length, density, and tension before the final embroidery.
What common issues occur with embroidered design on linen and how can you troubleshoot them quickly?
Common issues include puckering, edge fraying, skipped stitches, and uneven tension. Re-hoop with proper stabilizers or looser tension, adjust stitch density, and use the right needle size; run a test piece on scrap fabric to dial in settings. When finished, remove stabilizers carefully and press with a protective cloth to preserve texture.
| Aspect | Key Points | Notes |
|---|---|---|
| Why linen is a great canvas |
|
|
| Materials and prep: setting the stage for success |
|
|
| Stitches, tension, and technique |
|
|
| Design planning |
|
|
| Achieving clean results: tension, alignment, and finishing |
|
|
| Care and durability |
|
|
| Troubleshooting common issues |
|
|
| A quick-start project plan for beginners |
|